Some of the members of the Northern Conspiracy are using the new Volley and Bayonet Road to Glory battle generation system to play a small club tournament. We're using 3000 point armies with all of the French players playing games against all of the other players (playing armies of Prussia, Russia, Austria and England) in a round-robbin style tournament. This was my first game, and I drew my friend Robert as my opponent. Robert was using an army built from the Middle French list and I was using an army from the Middle Russian list. Our armies were similar in construction with two exceptions. The first was that Robert chose to build his divisions from provisional conscript troops which while a lower quality, allowed him to have several more divisions than I had. I chose to have two heavy batteries in my army. Both Robert and I had a guard division and dedicated guns attached to all of our line infantry.

The battlefield as chosen by both Robert and myself. Our tournament rules call for a DBA-ish method of alternating placement of terrain pieces. We both wanted a similar amount of terrain so placement was quick and easy. Terrain features were a wooden-walled town, two forests and two gentle hills. We diced for sides and Robert got the North side (top of the photos) and I got the south side.

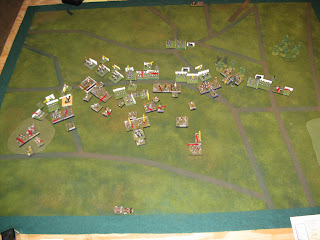
Initial deployment of both armies. Both the French and Russian players decided to deploy their reserves on the east deployment zone, which hinted of things to come...
 Russian turn 1:
 We didn't know who was supposed to move first so we diced for it. I won the roll so I started. The Russian turn one move was to advance across the line with my right wing in a slightly denied position with the reserve cavalry on my extreme right flank and Platov's cossack division in reserve.
 French Turn 1:
 The left (east) French wing is removed at the end of the turn. The French reserve protects the army's eastern flank and LOC. The right (east) Russian wing is remvoed. Both players drew similar deployment cards but on opposite flanks. The French attacked the Russian line in the center with mixed results, routing one brigade of Russian Musketeers with the Young guard, pushing back one brigade of Russian musketeers, but recoiling in two other locations due so the heavy support fire from the Russian batteries. On the west flank a division of French provisional conscript infantry advances to press the Russian flank.
 Russian turn 2:
 Russian counter-attacks on the right-center and center were successful, but required the victorious brigades on the right to form square after winning the melee. Most of the deployed Russian brigades and the two heavy batteries went stationary and one brigade occupied the town. On the far western flank Russian cavalry pushed back the provisional conscript infantry division that was testing that flank. On the Eastern flank both commanders were happy to maintain a safe distance without combat.
 French turn 2
: On the west flank French cavalry counter-attacked the Russian cavalry division with devastating results, exhausting it and causing it to suffer morale colapse. The Young Guard just east of the town routed another brigade of Russian musketeers and on the eastern side of the battlefield near the woods a provisional conscript division routs one of the Russian brigades near the woods forcing it through the woods and out the other side causing the other musketeer brigade and some cossacks (who were bravely hiding in the woods) to become disordered.
 Russian Turn 3:
 The Cossacks exited the woods to screen the routed and disordered Russian infantry on both sides of the woods. The exposed Russian brigade to the left of the woods retreats and reforms behind the cossacks. On the west flank the returning Russian detachment arrives, jut in the nick of time and advances to fill the hole created by the destroyed cavalry division. In the rear, Russian troops begin forming an ad-hoc last stand reserve from routed and collapsed divisions under the command of the left wing commander.
 French turn 3:
 The Young guard pushes back the Russian guard Jager brigade and occupies their position in a position to exchange ranged fire with the deployed Russian line, avoiding the heavy artillery. The French cavalry retreats from the eastern flank further. In the center, the French withdraw out of range of the Russian batteries.
 Russian turn 4:
 The Russian returing wing is forced to fill the hole that the (now exhausted) Russian Guard division has left in the center of the line. At the far western flank the Russians mount another cavalry charge with a fresh cavalry division beating and exhausting the French cavalry. This buys more time on that flank, but at the expense of nearly exhausting the Russian cavalry in the process.
 French turn 4:
 The returning French detachment wastes no time in jumping into the fray. The light cavalry brigades shake out into skirmish formation and dispatch the Cossacks, killing two stands, which exhausts the Cossacks. In addition to the returning detachment, an exhausted provincial brigade which advanced to support the French cavalry charge with ranged fire is disordered by their own cavalry when it routed after charging the Russian cavalry.
In the center the Young guard makes its final close assault of the battle, dispatching another brigade of Russian musketeers but in the process finally receives enough hits to exhaust themselves. They were done close assaulting, but proved to be dangerous for the rest of the battle causing several more casaulties through ranged fire. Behind them another French division assumes a flanking position threatening what remains of the Russian line.
On the far left, infantry range fire repulses the remaining Russian cavalry, exhausting it and collapsing its division's morale.
 Russian turn 5:
 The Russian's counter-charge on the eastern flank destroying a French cavalry division and sweeping up the disordered infantry division in a rout. In the center the Russian right battery hand pushes to provide better firing lanes to its left. Two Russian infantry divisions charge the rear of the flanking French brigades, but with only partial success: one Russian division is replused and left vulnerable to French cavalry counter-attacks, the other destroys the French brigade it attacked
 French turn 5:
 On the east flank the French infantry conduct aggressive range fire on the Russian cavalry but do not inflict significant damage. In the center the expected cavalry and infantry counter-charges rout the two disordered Russian brigades there. On the west flank the provisional conscript infantry brigade relentlessly returns to press the crumbling Russian left flank.
 Russian turn 6:
 The Russian cavalry on the east flank withdraws, in hopes to support the center while the French infantry has to make it's way around the woods to continue to press the attack. In the center the Russian batteries finish destroying the last French stands in range, and some Russian brigades are rallied and thrown into the gaping hole in the Russian line. On the western flank the Russians abandon their prepared lines, about face, and charge the flanking French infantry in flank routing it. With additional ranged shooting the Russian invalid reserve completes the exhaustion of that French division.
 French turn 6:
 On the east flank the French advance, choosing to send one division east of the woods and one west of the woods. In the center, all of the non-exhausted French divisions choose to remain out of range of the Russian heavy artillery. From the center to the west flank, the remaining French divisions are all exhausted, but continue to agressively conduct ranged combat with good success, causing an additional Russian exhausted cavalry division to finally collapse as it is destroyed.
 Russian turn 7:
 On the east flank the remaining exhausted cossacks take refuge in the woods. The reserve cavalry deploy to protect the exposed flank of the Russian battery. On the left the remaining non-exhausted Russian brigades return to reform their original line and conduct ranged fire on the cavalry and infantry there.
 French turn 7:
 On the east flank the French infantry continues to advance and fires on the Cossacks that are bravely hiding in the woods, but do not cause any casaluties. In the center, the other returning French reserve division routs one of the Russian batteries in an agressive frontal assault. Across the rest of the line range shooting is exchanged.
 Russian turn 8:
 The cossacks make a predictable break for the French baggage train (LOC). The Russian cavalry exacts revenge on the French brigade that routed their battery by destroying them in a countercharge aided by range fire from an exhausted Russian guard brigade that advanced up in support of the combat. Also in the center the other Russian battery and stationary infantry combined their fire and destroyed an additional French brigade, exhausting another French division. On the left the non-exhausted Russian division exchanged fire with exhausted French troops trading casaulties -- not something they enjoyed doing this late in the battle.
 French turn 8:
 The French continue to press the east flank, but they choose to egage the skirmishing Russian cavalry in ranged combat rahter than charging them, hoping to inflict casualties rather than just chase them away. In the rear the French form up an ad-hoc division of exhausted cavalry to entertain the cossacks, who don't really have the stomach for a fight. The other non-exhausted French division advances along the road behind the French lines, hoping to engage the non-exhausted Russian division that is anchored on the town.
 Russian turn 9:
 The russians limber up their artillery and re-deploy their center division to face the flanking French division while simultaniously supporting a cavalry charge of a pesky French brigade that was sniping at the cavalry. This attack destroyed the French brigade, collapsing it's division's morale, and clearing a hole in the center.
On the west flank the non-exhausted Russian division tires of trading casaluties with exhausted French troops and abandons the town and the line of defense there and withdraws towards the center, leaving some exhausted Russian infantry and cavalry to skirmish with the exhausted French there.
 French turn 9:
 The french division on the east flank turns right and deploys near the woods denying flank towards the Russian cavalry. The non-exhausted french division in the center forms line of battle towards the Russian center. Skirmishing continues between the rest of the exhausted troops with the French inflicting more casualties, eliminating a Russian Jager brigade.
 Russian turn 10:
 The Russians complete the reformation of their lines with the center division and artillery on the right, and the left Division on the left and one cavalry brigade in reserve. Russian cavalry charges through the gaps in the center routing a solitary French brigade and deploying the Russian guard cavalry in a position to threaten the French LOC. Outside the Russian central lines the remaining exhausted Russian riff-raff deploy in a second line to soften up the approaching non-exhausted French division in the center and to keep the exhausted French from skirmishing with their steady troops.
 French turn 10:
 The French, not wanting to stay in front of the Russian guns move their right-most division towards the center in hopes to join up with their center division. Their center division charges the Russian riff-raff, eliminating one Russian brigade, but amazingly are repulsed by the other disordered Russian brigade.
In the French rear, the French cavalry attempts to surround the Russian cavalry there to force it to charge them, but since the French are exhausted they are unable to charge home, and must instead settle for harrassing the Russian cavalry.
 Russian turn 11:
 The Russian guard cavalry charges a disordered French skirmish cavalry stand, which fails morale and routs. The Russians mount a four-brigade attack on the French division with the Russian guard cavalry covering the third of four sides. The Russians win both melees, forcing the division to rout en-masse and subsequently suffer morale colapse which elimitates the two routed stands.
French Turn 11: (sorry no photo) During the French turn 11 turn the French consolidated their remaining non-exhausted division and continued skirmishing with the other French troops, but after this turn we called the game.
The Final Score: I have to say, the scoring system we're using (which is an alternate system posted on the V&B mailing list and not the Road to Glory scoring system) rewards larger brigades. Robert's army gave my army fits at every turn and I felt on several turns that I was on the verge of total army collapse due to him having fresh non-exhausted available in a seemingly endless supply. Unfortunately since our scoring system awards points for exhausting and collapsing divisions, these smaller divisions offer up more available points to your oponent. Our system is scored like golf, with the lower score winning. The score was Robert (French): 23 points Allan (Russian) 12.5 points. Honestly I felt that the game was a very marginal victory for the Russians.
As an aside, if we scored this battle by the Road to Glory system, the Russians would have won 4-2 at the time we called the game as I controlled my own LOC and 3 un-exhausted wings, and Robert controlled his LOC and one un-exhausted wing.
I had a good time, and Robert was very gracious about the outcome, even considering his army gets what I feel is an unfair 'shake' in the scoring system.


 The cream of the British forces, the Guards brigade (I had to substitute Grenadier stands to represent some of the guards) and the Light Brigade advance on the right of the British line. Still to be moved from the works are the remaining British line troops. Just out of frame the German troops can be seen advancing from the works.
 The American defensive lines await the British attack. Note the small French reserve blocking the road behind the woods which is one of the two possible British evacuation routes.
 The British main body just before the first attacks go in. It's an impressive sight! Just out of frame to the left and slightly behind the main British force are the slower-marching Germans. This photo gives a good view of the on-stand roster labels we use which are color coded by brigade (in this case) or division depending on the scale of the battle.
 The British Guards brigade and Light Brigade charge home early in the game. Although the British elites had good success, the Americans were causing them considerable damage during the attacks, whittling away at their strength.
 Later in the battle, the left flank of the American lines has been driven back by the British Elite brigades, but at a cost that is too high to sustain. Both the Guards and Light brigades are near exhaustion with probably one good charge left in them. In the center Yorke's brigade has also sustained significant damage and faces fresh French reinforcements.
 On the left flank the Germans engage the American right but are held off or driven back while sustaining significant casualties. The German battalion guns do not seem to phase the Americans at all.


