Thursday, August 29, 2019

Electronic Brigadier Monouth Game in Albany, NY

Last weekend I made the four-hour trip from eastern New Hampshire to Albany, New York to run an Electronic Brigadier game at my friend Dave's house for him and some of our mutual friends and local New York Gamers. The group included several people with extensive experience playing computer-moderated wargames. I jumped at the chance to get more constructive feedback on my rules from people with such experience. Friday evening I arrived and Dave and I set up the table in his lovely gaming room.


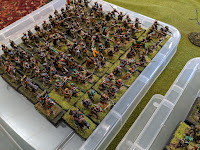
Here is a video of the initial positions of the troops early in the battle.


With nine players scheduled to play, I decided to forgo the historical Monmouth battle proper, and create a hypothetical battle a few days earlier deeper in New Jersey. This gave me creative license to modify the scenario's order of battle to accommodate the nine players as well as to get my covered bridge onto the tabletop as a scenario focus piece. The scenario starts with an assault of the New Jersey state troops and militia on the end of the British baggage train, followed by a general attack on the column by the rest of the rebel (aka future 'American') forces. The goal for the British would be to secure the bridge and area between the bridge and the dense woods. The Americans would need to hold this area and cut off the British to win. Although the Americans are outnumbered in the scenario, their starting position gives them numerical superiority where it counts, at the bridge. The British would have to attack there and drive them out to win.


Early assaults by the New Jersey militias were wildly successful, driving multiple British line units back in retreat and rout. British commanders held the large and resilient 42nd Highlanders in reserve in the bridge area. This would prove critical later in the battle.

New Jersey militia also occupied the woods west of the bridge, further imperiling the British escape route. 


On the western end of the battle, a general engagement ensued with the large wooded area and hilly area being contested by both sides. While the New Jersey loyalists hesitated to engage, The Queens American rangers got stuck in early and to good effect.

In the center, the British pressed forward into the American advance attempting to stop the American shift towards the Bridge. This was hotly contested with both sides having units driven from the line with a lot of give-and-take across the line. Early the British suffered from their aggressive attacks receiving more casualties than they inflicted.


Here is a video taken about two-thirds of the way through the battle.


As the battle raged on, the American troops started to wear from the pressure, the British army's higher quality and numbers started to swing the tide of the battle. This photo shows the high water mark of the American effort with the Bridge route fully threatened, battle looking very much going the American's way....


Regretfully, as the day went on fatigue set in and I neglected to take good photos of the last hour of gaming. The British committed their reserves, the 42nd Highlanders holding firm at the bridge, with more British clearing the woods west of the bridge. In the center, the British established a good cohesive battle line where the Americans were much more in disarray. The woods on the far left of the battlefield were cleared by elements of the Guards brigade, the 4th New York finally being driven out by a charge in their rear by the 2nd guards.

I include photos here of most of the players. What a fun group to game with. Everyone had fun and I received some good constructive feedback about the rules and scenario. I look forward to gaming in Albany again in the future. Thanks again to Dave for being an awesome welcoming host.

Wednesday, August 21, 2019

The Approach to Walcheren Game - At Northern Conspiracy Game Night


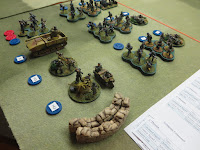
Last Friday I ran my new Approach to Walcheren scenario at our club's monthly game night. Summer game nights are less well attended, but I still had four players for my game which was plenty. Here you can see the initial table layout. Changes made after the play test included adding a minefield and a stretch of barbed wire, and some minor changes to the way the engineer's satchel charge rule was played. I also slightly changed the German order of battle, swapping out the stationary Flak 37 anti-aircraft gun for a Flakpanzer 38-t giving the Germans a bit more mobility with this asset.

German commanders Charlie and Bob set up some excellent defensive positions, including an ambush with the RSO Pak-40 anti-tank gun. Quite a historical use for that weapon. They did require a bog check to extract it from that position later in the game due to the rubble from the destroyed building.


British players Adam and Rob attacked aggressively early with the British commandos that infiltrated the farm prior to the battle. The commando .50 cal MG took out the German infantry gun right off the bat, but was then itself silenced by combined German MG and Flakpanzer 20mm fire. Adam moved his armor off board for a turn in order to enter off road to avoid the minefield that blocked the road.


Mid game saw Rob's commandos and headquarters units bearing the brunt of continued effective German MG and Flakpanzer fire, his units withering. It appeared that Adam would have to carry the day. Adam's engineers and tanks pushed Bob's Ostruppen from the river forcing them to retreat out of sigh behind a hill. Adam's first engineers planted a satchel charge on the dragon's teeth near the radar station, but quick reaction by both German commanders combined to take the engineers out before they could blow the charges.

Rob pushed his last commado squad to the bridge sand bags, eliminating an Ostruppen squad that drew the unlucky short straw to defend there. Charlie aggressively pressed the tired commandos with his HQ squad and commander, but the Commandos held firm, and Charlie was forced to fall back with his HQ.

On the right flank Charlie's RSO Pak-40 got an ambush shot on both the M-10 and the Cromwell. The M-10 was lucky enough to deflect the hit suffering only some morale markers. The Cromwell was missed. Returning the favor the RSO somehow pulled off a miracle bounce of incoming main tank rounds from the Cromwell once, but was eventually eliminated by a direct hit from the Cromwell's main gun.


Like something from a war movie, Rob rallied his remaining commando squad and used them and their 'Red Devils' rule go great effect. He spent multiple 'follow me' chits to chase down Charlie's headquarters squad and commanding officer and eliminate them behind enemy lines in a close skirmish and blaze of Sten gunfire. Soon after, exhausted and alone in the German-controlled town, the commandos themselves were wiped out by a counter attack. Still the damage was done and the Germans had lost their senior officer and the command and control he adds to their efforts. (i.e. they lost their 'follow me' tokens).

Meanwhile on the right, Adam wasn't to be outdone and his second engineer squad was able to blow the dragons teeth with another satchel charge. The well coordinated attack of the commandos and the engineers proved too much for the Germans to deal with simultaneously and trying to save their commander took priority. With the Dragon's teeth cleared Adam's M-10 pressed over the ford to begin shelling the town and to engage the RSO Pak-40. Adam's Cromwell took up a central position opposite the town and began shelling the buildings.

With the ford secured and a British infantry unit already able to push across the bridge (albeit at a great cost), the victory was secured for the British. This was a close fought game and the British suffered significantly more casualties than the Germans accomplishing their goal. Had a few rolls gone their way the outcome could have definitely gone the other way. Well played by players on both sides. Adam, the only player who didn't participate in the play test, played particularly well with his infantry and armor both having great success with minimal losses.


The other main game for the evening was the MASSIVE and spectacularly figured Crimean War game of the Battle of MacKenzie Heights put on by Mark of the My Brave Fusiliers! Blog. There are better pictures and a great write up of this game over on Mark's blog. (follow the link above).


Rounding out the evening, president Dick ran a table of Saga to help players get ready for our upcoming October game day which will use these rules.

Thursday, August 8, 2019

The Approach to Walcheren Playtest - WWII October 1944

Last Friday evening seven of my friends came over for a play test of the game I'll be running this month at our club's monthly game night. The scenario is called 'The Approach to Walcheren'. It is a what-if scenario based on the days leading up to the battle of Walcheren Causway. In the scenario British armor supported by infantry need to clear a river crossing guarded by German 'Osttruppen' and Luftwaffe ground troops responsible for protecting a nearby radar station. Thanks are due to Ed of Ed M's Wargaming Meanderings blog for donating photos of the game. I was a bit too busy running the game to take adequate photos.

The British forces included a good selection of armor, a platoon of Royal engineers, and a platoon of  No. 41 Royal Marine Commandos.  Orders for the British were to secure a crossing across the river, either by clearing the central bridge and pillbox, or by clearing one of the two fords.

German forces were three platoons of kampfgrupped infantry, mixed Lufftwaffe and Ostruppen. The command elements included a 120mm mortar, an RSO Pak-40 self-propelled anti-tank gun and a Flak 37 anti-aircraft battery. The defending German forces also received some pre-prepared emplacements to deploy as they saw fit.

Wargaming dog Lola seemed to be slightly more partial to the German defenders. Bribery is suspected....

This is the view from the British jump-off point. The commandos had captured the small farmhouse overnight while the defending Germans would be waiting on the far side of the river. The rules used were modified Iron Cross. I've made some changes to make multi-player game play faster. I also adjusted the morale system, to make it less variable.

The attacking British. Bob commanded the engineers, Byron the armor, Jeff the commandos and Charlie the HQ assets and Lieutenant.

Me at the end of the table pulling a command token to start the game. Ralph commanding German 2nd platoon and Rob command German 1st platoon. Behind the camera Ed with German 3rd platoon and HQ.

Early in the game Jeff's commando machine gun and infantry pushed off some of Ralph's Osttruppen in the woods opposite the ford. Bob rushed a unit of engineers up to the dragon's teeth planting a satchel charge. The crazy engineers set the charge off too soon and took a morale marker from the blast, but cleared the obstacle. Later on in the battle they would be eliminated.

Continuing his aggressive play, Bob rushed his universal carrier over the cleared ford carrying his flamethrower detachment right up to the craters outside of the village. Ed and Ralph's defending Luftwaffe units combined to wipe out the carrier with a panzerfoust blast and then killed the flamethrower team before it could unleash hot fire on the town or bunker. British engineer casualties continued to mount as another squad was eliminated by combined counter-attacks from all three German players as the Engineers attempted to attack the rear door of the bunker with another satchel charge.

Keeping Rob's AA battery and infantry honest, Byron's armor can be seen coming up the road in the distance of this shot. Byron's command armored car engaged Rob's Osttruppen while his Cromwell dueled with the Bunker. Both the Cromwell and M-10 tank destroyer dueled briefly with the RSO Pak 40 with neither scoring a hit. In the end, the Germans inflicted many more casualties to the attacking British, but the British did secure one ford and had a good start on pressing home the attack on the bridge and pillbox. This resulted in a narrow British victory.

At the end a successful play test and I received great feedback on how to make the scenario even better for our club's upcoming game night. The multi-player changes were well received. The players recommended good constructive changes to the scenario victory conditions and morale check system, both of which will result in improvements in the game.

Thursday, August 1, 2019

28mm British WWII Engineers

This month I'm running a WWII skirmish game at my club using some house rules added on to Iron Cross to aid in faster multi-player game play. The game will be a British assault to capture a bridge defended by a German garrison and a pillbox. Think Pegasus Bridge with a much more modest bridge. The action is set around the dash from Carentan into the heart of France.

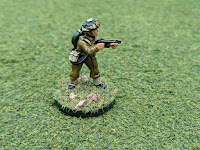
With a pillbox as a primary terrain feature, I really wanted the British to have tools to assault with. To me, this means some engineers and primarily a flamethrower team. This is Warlord Games pack WGB-BI-49. Nothing particularly special, with the paint job. It is my normal block paint with sepia wash. Quick and dirty, finished just in time for the play test tomorrow night. They still need a coat or two more of flat varnish to cut down the sheen. They're likely to get that after Friday night's play test game.

These will count as five figures in my annual painting totals. Painting has slowed to a stop for me during the spring, as I coach high school pole vault. Now that track season is over, and the summer heat wave has hit, I expect painting to resume to it's normal (aka slow) pace. Next up on the painting table, 16 crusades spear-men to act as warriors in my Saga crusades army.