This brings my Crusader Saga army to four points of troops. Next up for this army will be two points worth of hearthguard cavalry and a mounted Warlord. The pack of figures I'm using for these has 10 figures. The final figure will most likely be a banner carrier.
Friday, September 27, 2019
28mm Crusades Crossbowmen
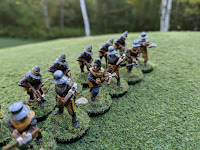
This is a unit of twelve Old Glory 28mm crossbowmen for my Saga Crusaders army. The poses don't lend themselves to easily photographing the figures faces as they're all looking down going about their business.
This brings my Crusader Saga army to four points of troops. Next up for this army will be two points worth of hearthguard cavalry and a mounted Warlord. The pack of figures I'm using for these has 10 figures. The final figure will most likely be a banner carrier.
Sunday, September 15, 2019
Northern Conspiracy September 2019 Game Night
Ed brought his Mongols with the same composition as game #2 which he won by a large margin. Why fix what isn't broken? I dropped the legendary commander in my Eastern Princes list for a second unit of hearthguard cavalry. The rest of my list was the same, Black Hoods eastern cavalry mercenaries, two foot warrior units and my levy crossbowmen. Why take a wagon when the crossbow unit has the same effect as the wagon's 'Lure of Avarice' special rule? The enemy wants to kill the crossbows first.
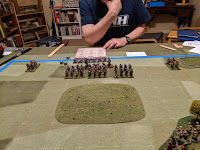
Rob Z. is likely to push a borrowed Mongol army at game day, so he watched on to learn the tricks of the trade from Ed. I have to say Ed has a good grip on the Mongol's 'dirty tricks' so Rob had a good teacher. We were using Michael's box-o-terrain which was mostly woods. Ed and I improvised with the felts to represent the various terrain pieces. The olive green piece is Ed's favorite Mongol-friendly large hill, again placed first to dominate the center of the table. The bright green felt to the left is a ruin...something the Mongol's can't burn down. (I'm learning!) The woods in the rear were placed last by me, to hopefully narrow the front. Ed chose to put a four-figure warrior unit on the far side of this which limited some of my free maneuvers, but also kept Ed's warriors out of the fight for most of the game. Even trade there I think.
Turn one was mainly maneuvering by Ed and I. In Ed's turn two he launched his mongol initial attack. A bow volley from his hearthguard and a second shot by his mounted warriors. He flaked four crossbows. The terrain here saved me a couple of figures for sure. Ed used some Mongol 'dirty tricks' to withdraw his entire army after the shooting. He was hoping to prevent my warriors from repeating their counter-charge of the bow-armed hearthguards. He was successful in accomplishing this. I couldn't reach him even with a double move from my warriors.
En Ed's half of turn four he completed the destruction of my hearthguards with ranged fire from two warriors and a coup-de-grass charge from his hearthguards. I was able to chip away one additional figure from Ed's hearthguard in the melee.
My follow-up was to advance my entire army in a slightly more cohesive battle line. I poured most of my Saga dice into a shot from my crossbows which flaked some warrior figures off Ed's right-flank unit. My remaining hearthguard unit charged home on Ed's warriors killing four of them while suffering two exhaustion.
In turn five, Ed did a good job of shooting up my remaining hearthguard unit with both of his warrior units. He flaked three figures with two shooting attacks. Ed also was able to flake four figures from my Black hoods with a charge from his largest remaining warrior unit. This put the game very much in the balance for the final turn and a half.
My half of turn five went ok, I ended up flaking two more of Ed's hearthguard with my crossbows, withdrew my sole remaining hearthguard figure and brought up my infantry. I hoped Ed would think he was behind and engage, but he withdrew which ended up I think being the correct choice.
In turn six Ed shot with his warriors completing the destruction of the Black Hoods and withdrew his army to a bulwark in the corner of the board.
My half of turn six was uneventful. I didn't think risking my Warlord in a headlong charge into Ed's units had enough reward to warrant the risk, and I thought I might actually be ahead on points. I was wrong on one of those two for sure and probably wrong on both. Instead I took a pot-shot at Ed's trailing warrior unit to no effect.
Ed and I totaled up the points for the game and the tie-breaker game ended up 17 points vs. 17 points. A TIE! So there will be another game at some point to decide it! Great game played by Ed. It was lots of fun with Saga ending up being a decent spectator sport as several ended up watching the end of the match as other games wrapped up early.
Michael's other table of Saga had four players, including guest Conspirator alumni, Randy. This was some hot Anglo-Saxon on Viking action. I was too engrossed in my own game to find out who won.
Thanks again to Michael for providing Ed and I terrain and a table cover and the opportunity to play another practice game of Saga.
Pete S. ran a lovely looking Plains Indians vs US Cavalry game using 'She Wore a Yellow Ribbon' rules.
Phil set up his 'battle of the snowshoes' FIW game, but unfortunately there weren't enough players to run all the games. This is the tail end of the summer slow season for the club. Hopefully as the weather turns colder attendance will climb back up to normal levels.
Monday, September 9, 2019
Crusades Spearmen
Playing a lot of Saga recently has motivated me to base up these crusades spearmen that I've had finished on my painting table for a few weeks. These can be two Saga points worth of warriors but also include four sword-armed figures suitable for foot hearth guard if I prefer.
The figures are Old Glory Norman heavy infantry with Little Big Man Studios shield transfers. Sixteen figures added to this year's totals. Next up on the painting table are some crusades crossbowmen.
Saga Practice at Ed M's II - Revenge of the Horde
Friday night Ed M. of Ed M's Wargames Meanderings Blog and I were both were bachelors for the evening so we decided to give another go at Saga. Both of us brought the same armies, with different builds. Ed's Mongols brought one HUGE unit of hearth guards and an extra unit of mounted warriors. My Eastern Princedoms force ditched the fortified wagon for a unit of hearth guard, and instead of the lifeguards upgraded to the Legendary hero Alexander Nevsky. I also upgraded my Eastern horsemen to the Black Hoods....and then never used any of their Black Hoods special traits...but I digress. On to the game!
I ended up being 2nd player so was able to put an extra piece of terrain on the table. Ed started off with an open hill in the center of the table. I chose some woods and two hard terrain pieces. Ed's final choice was a field he moved to his baseline.
I deployed my crossbows and a unit of warriors in the woods opposite the field. The rest of my forces were set behind. My thoughts were I could react to the Mongol's first move with my reserves. My logic for this choice ended up being quite flawed and Ed's horde was upon me well before I could react and the terrain only hindered my ability to react.
Ed's deployment was in a solid block based around his war drummer and warlord. He had two small warrior units flanking.
Ed's initial approach was to set up mostly opposite my battle line in the woods.
Ed's initial move was to use one of his warrior units to torch the woods using a special Mongol Saga ability that negated the woods terrain value and disordered my troops within. Note to self...woods vs. Mongols are not a good idea.
Ed followed this up with a revenge bow shot from his hearth guard unit on to my crossbows. Something personal about them knocking them out the previous game. The shot sent seven (7) of the crossbowmen to their graves. Not bad getting 7 casualties from an 8-die attack! Levy don't make very durable targets it appears.
I followed up with a counter charge by my warriors who threw all of their might (and Saga dice abilities) into a glorious charge into Ed's giant hearth guard unit. The warriors scored 4 hearth guard kills at the cost of three of their numbers. Pyrrhos would be proud.
My Black Hoods also picked off a couple of Ed's torch-bearing warriors with some accurate bow fire.
From here it was mostly mop-up duty for the Mongols. I made some desperate counter charges by my hearth guard and warlord, but they were futile. The numbers were so in favor of the Mongols, that even a huge roll from my warlord against Ed's warlord couldn't save the day as both Ed's warlord and war drummer got just enough saving rolls to escape the ordeal with just fatigue, no casualties.
My exhausted warlord and hearth guards were easy pickings. Ed sealed the deal with a tactical withdrawal at the end using his superior mobility to keep my remaining relevant forces at arms length.
I learned a lot, and Ed out played me handily in this game. Hopefully next time I will make better decisions and give my troops a fighting chance.
Wednesday, September 4, 2019
Saga Practice at Ed M's
Last Sunday Ed M. of Ed M's Wargames Meanderings Blog and I took advantage of the long weekend to play a game of Saga. We're both participating in our club's Saga game day and thought we could use the practice. Ed invited me to his gaming loft which, as you can see in the photos, is a nicely decorated and comfortable gaming space.
Ed was using his Mongol army which includes the beautiful hearthguard he recently completed and featured on his blog. Ed's army included the very effective war drummer, two six-figure hearthguard cavalry units, and sixteen mounted warriors in three units, one eight-figure and two four-figure units. Ed's army started with seven (7) available Saga dice.
I was using my Eastern Princes Russian crusader army. I fielded a lifeguard for my warlord, the war wagon, two eight-figure units of foot warriors, one twelve-figure crossbow unit and a mercenary unit if eastern horsemen. My Saga dice pool started with five (5) available Saga dice.
With hordes of mounted Mongols coming at me I picked as much terrain as the 'Clash of Warlords' scenario allowed. Ed picked a large open hill as his first choice reserving at least some cavalry friendly terrain. After placement I ended up with one area of scrub in my deployment area which I plunked my crossbows into. The rest of the defendable terrain was out of reach, and ended up mostly out of play for the game. Ed's hill choice here was a brilliant move.
Things went all Mongol early. Ed used his war drummer to good effect coordinating two charges on my exposed warrior unit. The combined attacks scored five hits. Five figures down, my warrior unit ended up limping to the rear to remain inactive until the last turn. I attempted to kill Ed's drummer with the eastern archers, but the drummer saved all hits. The eastern archers were chased away the next turn by Ed's five-figure warrior unit.
In my turn I tried to counter-attack with my warlord and lifeguard. I was rolling to hit on 3 or better and I got the above dice, plus three that scored 3 hits on Ed's large warrior unit. Ed's warriors withdrew, still able to generate a saga die. My warlord, with a fatigue on it, was counter-charged and lost a lifeguard figure and became exhausted. Ed also charged my war wagon with one of his hearthguard. He eliminated the wagon at a cost of one hearthguard figure.
As the action heated up I forgot to take some photos. Turn three I finally got my crossbows into action. They used a Saga ability to launch a very effective volley against Ed's warlord, eliminating it. In Ed's turn he consolidated his forces hoping to have enough damage secured to hold onto a win. I advanced with my crossbows and eliminated Ed's damaged hearthguard unit. Ed's fresh hearthguard counter-charged my crossbows killing seven figures, pushing it away easily without receiving any damage himself.
In turn six I counter-attacked Ed's hearthguard with my remaining warrior unit to good effect, eliminating three figures, suffering no hits myself. In the center the pesky eastern archers finally finished off Ed's war drummer. Ed's half of turn six included a rush from the flank by one of his four-figure warrior units attempting to finish off the remaining three figures of warriors from the unit that was gored in turn one. Ed almost got it, killing two of the three figures.
The game ended with me edging Ed out for points. I think it was partially due to not having any hearthguard that I was able to suffer nearly equal figure losses, but still come ahead on massacre points.
Lessons learned:
Thanks again to Ed for hosting. I look forward to the next game!
With hordes of mounted Mongols coming at me I picked as much terrain as the 'Clash of Warlords' scenario allowed. Ed picked a large open hill as his first choice reserving at least some cavalry friendly terrain. After placement I ended up with one area of scrub in my deployment area which I plunked my crossbows into. The rest of the defendable terrain was out of reach, and ended up mostly out of play for the game. Ed's hill choice here was a brilliant move.
Things went all Mongol early. Ed used his war drummer to good effect coordinating two charges on my exposed warrior unit. The combined attacks scored five hits. Five figures down, my warrior unit ended up limping to the rear to remain inactive until the last turn. I attempted to kill Ed's drummer with the eastern archers, but the drummer saved all hits. The eastern archers were chased away the next turn by Ed's five-figure warrior unit.
In my turn I tried to counter-attack with my warlord and lifeguard. I was rolling to hit on 3 or better and I got the above dice, plus three that scored 3 hits on Ed's large warrior unit. Ed's warriors withdrew, still able to generate a saga die. My warlord, with a fatigue on it, was counter-charged and lost a lifeguard figure and became exhausted. Ed also charged my war wagon with one of his hearthguard. He eliminated the wagon at a cost of one hearthguard figure.
As the action heated up I forgot to take some photos. Turn three I finally got my crossbows into action. They used a Saga ability to launch a very effective volley against Ed's warlord, eliminating it. In Ed's turn he consolidated his forces hoping to have enough damage secured to hold onto a win. I advanced with my crossbows and eliminated Ed's damaged hearthguard unit. Ed's fresh hearthguard counter-charged my crossbows killing seven figures, pushing it away easily without receiving any damage himself.
In turn six I counter-attacked Ed's hearthguard with my remaining warrior unit to good effect, eliminating three figures, suffering no hits myself. In the center the pesky eastern archers finally finished off Ed's war drummer. Ed's half of turn six included a rush from the flank by one of his four-figure warrior units attempting to finish off the remaining three figures of warriors from the unit that was gored in turn one. Ed almost got it, killing two of the three figures.
The game ended with me edging Ed out for points. I think it was partially due to not having any hearthguard that I was able to suffer nearly equal figure losses, but still come ahead on massacre points.
Lessons learned:
- The war wagon was fun to paint, and may be fun for a casual game, but it's not a very competitive unit in terms of effectiveness per army point spent. I think I'd rather have something else.
- Crossbows are really good if you can use them with the Crossfire battle board ability.
- Crossbows are very vulnerable outside of terrain
- Lifeguard are fun, but I think for 1 point I'd rather have a whole unit that generates a Saga die. They might be worth it if you chose a legendary hero?
- You can weather a bad swing of dice and still win in Saga if you make solid choices throughout the game.
- 1 on 1 games are a lot of fun with a good friend to play with. We play a lot of many vs many games and less 1 on 1. I'm thinking with the right opponents and gaming systems I may want to play more head to head games.
Thanks again to Ed for hosting. I look forward to the next game!
Subscribe to:
Posts (Atom)