This upcoming October I am teaming up with three other Northern Conspirators to host our annual game day. This is typically a large single game, or related tables as part of a campaign. This year we're going to do the Allied invasion of Italy at Salerno. Each of us is taking a key battle during the brief campaign. Having a laser, and wanting to try something new and unique, I have volunteered to do the Salerno 'Tobacco Factory' as the allies called it. In reality it was a complex of warehouses and drying sheds for processing the tobacco grown in the surrounding area.
The Italians called the complex the "Tabacchificio Fioche". The black and white photo above was taken well after the battle after significant clean up had happened. The rubble and bricks removed presumably for rebuilding efforts elsewhere. To the bottom right of the photo you can see a bridge over a small, but tactically significant river. The factory complex acted as a natural hard point for this key bridge. The British tried to take the complex at least four times and the Americans twice, before the final battle for it secured it permanently for the allies.
This is a modern photo shows the remaining ruins of the complex which have been partially preserved. The key characteristic is the primarily white field with rows of red bricks exposed. Pre-war black and white photos show this pattern to have been part of these buildings construction and not an artifact of wear or damage. To make my tabletop buildings I'd like to replicate at least the theme of this pattern, as much as possible. I've developed some techniques to assist in this using multiple layers of paint and the laser to remove the brick 'strips'. After assembly I'll add battle damage, dirt and grime. Starting with near-pristine patterns will make all the weathering more realistic.
This is the shell of the first of five large buildings. From the photos they come in two forms, one with tall doors and one with normal doors and ventilation windows. This is the latter. I still have additional applique brick work to add around the openings.
Below is the first of the wedge-shaped smaller buildings. This one is temporarily taped together. I still have to hand-sand the bevels in each panel and cut a base for it before assembly.
This is a close-up of a sample I made to test the laser technique. The middle row near the figure's wrist is what is used on the buildings. The bricks are near scale. The buildings are intentionally under-sized to allow the entire complex to fit on a 6' x 8' table and still allow room around it for maneuver. I didn't want fighting the fight like a Stalingrad battle to be the only option.
I still have a long way to go, but at least the techniques look like they'll work. I also have the majority of the computer CAD work done. Now it's just spending the time to make all the buildings, scratch build seven roofs and weather everything. There's also three ruined buildings to make. More on those soon.....
Step 6 - finish painting by hand: I started off with a two-inch house painting brush and some cheap craft paints in various shades of brown. I followed this up with a one-inch hobby brush with various greys and sand colors using hobby paints streaking the craters from the center out to the edge. I then picked out some rocks and painted them various earth shades and followed up with a detail dry brush in selected areas. A final darkening at the impact point was done with dirty black to give it a scorched look.
I wanted these to look like blasted earth and not part of the moon. To achieve this I tried to stay away from grey as much as possible and stick with a earth palette. I'm pretty happy with this decision, although a bit too much grey still ended up coming through in the end.
I'm counting these as five terrain/misc created in the annual painting totals. Even though they were just re-paints, I put enough time into them for them to count.
This is a set of "homemade" Saga Ordenstadt dice that I've recently made for myself. I put homemade in quotes, because it's not really fair to say as most people don't have a laser engraver in their home. With maker spaces becoming more common these days, more people do have access to them now. Projects on the laser aren't any harder than painting a figure once you get access to the equipment. Studio Tomahawk, the publisher of Saga, provides the dice graphics for people to make their own dice. As long as they're for your personal use, I believe this is an activity permitted (encouraged?) by the rules publisher.
Earlier I posted a photo sample die that I made. After some corrections to the settings of my laser I believe I have things dialed in nicely. This is a fairly laborious job involving a lot of masking of the dice with painter's tape, laser engraving the pattern onto each face, then removing the masking tape. The latter is particularly labor intensive due to the very tiny bits of tape left in some portions of the pattern. These need to be 'weeded' off each face with a hobby knife, tape, etc. Each die is then washed with water and a soft cloth.
They're not perfect, but they'll roll fair and are serviceable. For armies I just want to try out I make more sets. I did purchase two official dice sets for the armies I intend to play the most. For comparison, the Studio Tomahawk Ordenstadt dice are shown below:
In Pimp Your Craters Part One we left off at step two, having textured the topside of the craters. This is part two.
Step 3 - hide the ugly flange: This step was straight forward. I coated the flanges with PVA glue and added some larger rocks from model railroad talus, and then filled the rest of the area with model railroad medium ballast stones. These photos are after drying overnight.
Step 4 - prime black: To get a uniform coloring I primed the whole set in matte black primer.
Step 5 - over spray earth brown: This was done using a mix of brown rattle can spray paints. Photographed while this paint was still wet.
Next up in part three, detail painting with brushes by hand.
My friend and fellow Northern Conspirator Mike has been promoting the Saga rule set within the club recently. He's even been hosting some one-on-one and small group games to introduce new players to the rules. It seems that his efforts have paid off as several of us are starting Saga armies to use with the the 'Age of Crusades' era / source book.
I'm starting off with some generic Crusader units and will probably eventually create enough units to do most of the Christian armies. Later I'll likely want to do some of the Muslim armies to oppose them. Of particular interest are the armies with camels. I've never painted any camel-mounted troops.
These figures are from Gripping Beast and represent two four-figure units of hearthguards. The shield transfers are from Little Big Men Studios. I have some experience building plastic models and prefer water slide decals, sometimes even making my own. LBMS transfers are a hybrid between stick-on and water slide. Applying them may be more intuitive for those without experience using water slide decals, but for me I found them less easy to use. The graphics were sized appropriately for the Gripping Beast figures and the graphics with the exception of one shield so far were very good. The one shield that didn't keep it's detail as well as the rest just looks dirty, which is quite acceptable.
The first unit is Gripping Beast's "military sergeants with hand weapons". They're more uniformly equipped and I believe intended for the Milites Christi warband which explains their uniform equipment. I've kept the equipment regular, but varied the shields which I hope will give them a bit more utility. Eventually I may paint up a full uniform Milites Christi force with matching shields, but for my first units I prefer the flexibility.
These are wonderful figures with great equipment detail. Even the backs of the figures without cloaks have straps and buckles on them. I took some extra time to do a gray highlight on the black cloaks on these. The only complaint I have with these is the photographs on the Gripping Beast website depict these equipped with axes and swords. The weapon hands being separate. My pack only contained hands with swords - no axes.
The second unit is Gripping Beast's "dismounted knights #4". Three of the four of these come with shields detached and hands without weapons. I would have preferred all four match, either all with or all without. The one odd figure looks a bit misplaced among the others. The hands do not come pre-drilled. Not much else to say here, the figures have good detail and painted up quickly.
Saga has a lot of dice. Each army needs eight. Tomahawk Games provides images so you can make your own dice if you like. I purchased a set of Christian and Muslim dice, but the rest I will probably make on my laser engraver. This sample Teutonic die I created to see if making my own would be doable. I need to adjust the laser's settings to get the design etched deeper into the die's surface, but I think the end result will be worth the manual labor or masking and painting the dice. There's something about making your own stuff that's very satisfying.
A couple of months ago I bought some vacuform craters made by Pegasus Hobbies at my local hobby shop. I bought them because they're the right scale for 28mm and had a nice selection of sizes and shapes at a reasonable cost. I could have dry-brushed them as-is and dropped them on the table, but that's just not my style. I was afraid that they'd be too light and would move on the table, and I was not excited about the flat flange around the edge of each. This is part one of how I'm working on them to make them better.
Step 1 - solve the weight issue: I did this by filling each crater about half way with #6 lead shot. I had this hanging around my shop as it's a material I use to make ballast blocks for R/C model airplanes. Sand probably would have worked just as well. After I got the lead shot spread out evenly I drizzled PVA (Elmers) glue over the lead shot. I thought I might have to stir it in, but capillary action spread it out perfectly. These photos were taken after the PVA dried for 48 hours. There seems to be enough texture in the crater models to let the PVA bond well enough to the plastic. The craters are now too heavy. Sand would have worked better and kept the weight just right.
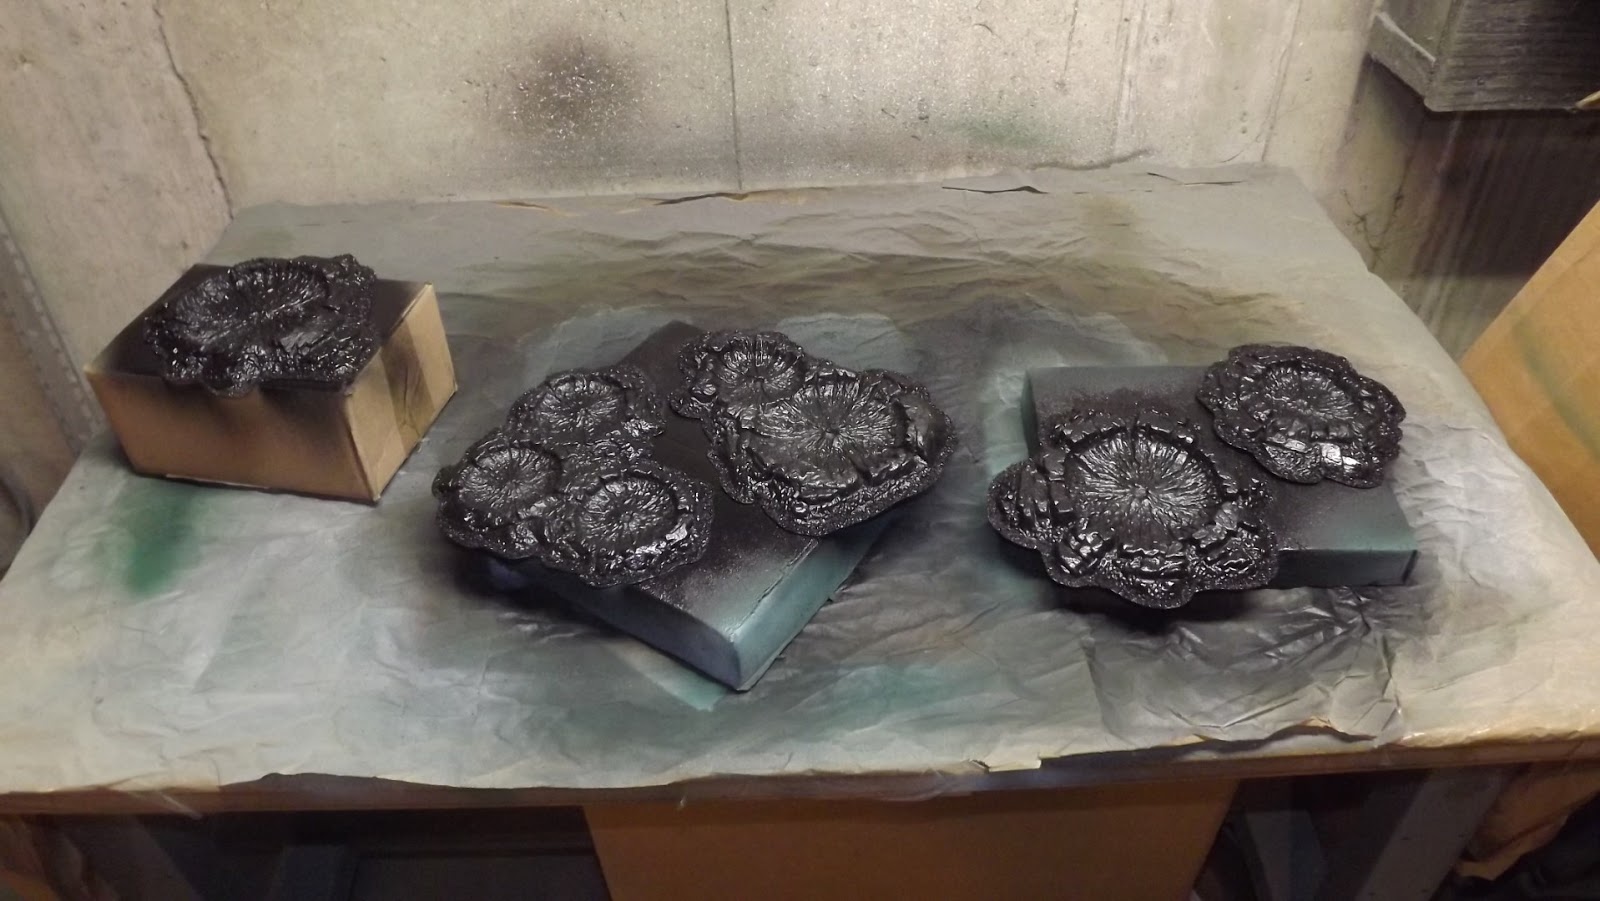
Step 2 - keep the craters from sliding around: After the PVA was good and try, I sprayed the underside of the craters with textured spray paint. I chose a texture that was very fine - just enough to give the crater bases some grip on the tabletop. I also sprayed all of the lead shot with a coat of paint. I did this mostly to add a second layer of binder over the PVA and to moisture-proof the lead and PVA mix. The photos below were taken while the paint was still wet. When dry it's a flat finish like the top of the paint can.
After seeing how nice the texture looked on the crater undersides, I thought it would improve the
top of the craters, reducing the smoothness of the plastic. Craters are
made of blasted-up dirt. They shouldn't be smooth at all.
It was my hope that this texture would also hide the flat flange at the edge of the crater models, but alas, they still look quite artificial. I guess that's going to be step 3 in the next update. Stay tuned.....
I've been re-organizing my figures and wargaming storage lately. One thing I have WAY too many of is un-built WWI aircraft kits in 1/72 scale. If anything in the photos below interests you, please check out my ebay auctions for these kits.
Last night I ran a new AWI scenario at the Northern Conspiracy's August game night using my Electronic Brigadier rules. This was a hypothetical AWI scenario prior to the Battle of Monmouth. The scenario pits Charles Lee's American Advanced guard against a portion of the British column of march commanded by Sir Henry Clinton. The premise is completed by assuming that elsewhere to the west Lord Cornwallis and General Washington will square off in a separate battle and Clinton is to destroy Lee's force which is blocking the British route to Philadelphia. It's a seven player scenario, but with three veteran Electronic brigadiers and plus one additional player who was familiar with the rules we gave it a go.
The Americans, were led by Dick and Bob (below left) and the British were commanded by Charlie and Ralph (below right).
The Americans had two brigades comprised of mostly continentals and veteran state troops. Their final command was a New Jersey brigade of state troops and local militia. The British had an advanced guard comprised of cavalry, light infantry and Hessian grenadiers, the guards brigade and two full brigades of British line regiments. The guards brigade was bolstered by four twelve pound field guns.
Bob's New Jersey brigade got partially over the stream that blocked their approach while Charlie deployed. One unit of militia guarded the stream bank to attempt to discourage a crossing by the British. Charlie's line unit there engaged across the stream in a firefight that eventually drove off the militia. Closer towards the center the British first light regiment and the Queens Rangers slugged it out with Bob's continentals in a bloody exchange where neither side wanted to leave. Eventually two of Bob's units including his militia and one of Charlie's started to waver towards the end of the evening.
On the west flank (British left flank) the British twelve pound battery sent out a devastating initial barrage which stuck home on a section of American three pound guns with a force that sent the gunners running. They eventually quit the field without the courage to return to their guns. On the far left flank the British engaged in long range musketry while Dick's Americans held their fire, waiting for a 'whites of their eyes' moment. Ralph's third brigade eventually advanced into close range and Dick got his shot which was effective, but the British morale wasn't put into question.
The climax of the fight was a series of charges in the center by the guard's brigade against Bob's Virginians. The initial charge was stopped by a stinging volley by the Virginians forcing the British to halt and conduct a firefight. In the next two turns Ralph brought up two fresh Guards regiments and charged the Virginians with a two vs. one attack that caused the Virginians to flee to the rear due to shaken morale. Bob's 4th New York continentals were in reserve and the only thing between the guards and the shaken Virginians.
With time running out we concluded the battle after 24 turns with the battle still in question, but with the British having the upper hand in terms of army morale state and units lost. Having a full seven players would have let us get a couple more turns in, but even considering that the conclusion was that casualties need to be more impactful in morale. Charlie and Bob each had units whose casualties should have caused them morale problems. An adjustment in this portion of the morale procedure will be made based on this. There were also some other procedural changes that were recommended that will be added.
Below is a short video of the game table during the game:
Mark put on a huge Crimean war battle using Charge of the Light Brigade rules. The battle pitted a huge array of British and Russian figure and also included his European farm complete with various and sundry farm animals. I believe in this one the British put the lead to the Russians and good. Russians shown below were George and Art (left). British were Dave and GM Mark.
Below is a short video of the game table during the game:
Greg ran a 1940 WWII game using Chain of Command of the Battle of Narvik. Chain of command is one of two WWII skirmish rule sets that are currently very popular with the Club. This year each game night has a featured game that is supposed to be 'not your ordinary game'. Greg offered this seldom gamed theater of WWII to fill August's extraordinary game slot.
Below is a short video of the game table during the game: