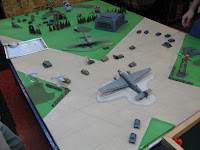
Today we had our fourth meeting of the early war escalation league at Adler Hobby. Since this was the last Saturday of the month this was our modeling day. I came prepared to work on army lists with the help from some of the other people but ended up spending the afternoon chatting and watching the one game that got played between German Light Panzers and a new league member's just-based Polish Infantry. Since the Poles were just picked up they were used unpainted, although the sample anti-tank gun that the owner painted up looked very nice, so I look forward to seeing this army painted up.
First, the eye candy. Jerry brought in his whole 1750 point French heavy tank company, which he had completed before Blitzkrieg was released. This is a beautifully painted force which looks like it's going to be quite effective on the battlefield as well. Jerry painted each model of tank as if it were produced at a different factory which makes for a stunning mix of cammo patterns. Apologies to Jerry, I somehow took the photo and only got photos of his recon armored cars and two platoons of Char-B tanks. His two other combat platoons of medium tanks are out of frame....DOH!
Next up, photos from the one game played. Again at 600 points the infantry took it on the chin from the light panzer swarm. Although the Poles had a battery of four artillery pieces with good direct AT capabilities, they weren't enough to stem the flow of the blitzing tanks. A few of the excellent Polish AT guns might help this.
While I was at the store I picked up four Pak-36 anti tank guns for my German Pioneers. Hopefully they'll help out at 600 and 950 points since the current meta game in the league at 600 points is quite tank heavy. Clever thing this escalation league. Once I'm done I'll probably end up with over 2000 points worth of troops. Fun stuff!
Saturday, October 30, 2010
Friday, October 29, 2010
Carnage the 13th
This year is the 13th year for the Carnage Convention hosted by our nearby friends in Eastern Vermont. The convention will be held in one week from November 5-7 in scenic Fairlee, Vermont. This is an excellent mixed convention with historical miniatures, fantasy/sci-fi miniatures, RPG, board games, a diplomacy tournament and a good vendor area with vendors supporting all of these gaming genres.
This year I will be helping the Carnage staff as the coordinator of the 'Centuries of Conflict' historical wargaming themed event. This year's theme is the 18th Century and we have an excellent selection of 18th century period events spanning the entire convention. You can read more about all of the games, in the official Carnage Convention Booklet. My work in preparing for the convention has pre-empted most of my other wargaming endeavours hence the lack of posts since my return from vacation.
For fans of my AWI figures and games, I'll have a post-Carnage report of my Carnage & Glory battle of Bemis Heights game. This will be the same scenario that I last ran at the Huzzah! convention this past spring.
I hope to see you all there!
Friday, October 15, 2010
Off to see the Mouse
My wife Lori and I are heading off for a week's vacation to Orlando starting this weekend. There won't be any blog updates while we're gone. In addition to the obligatory visits to the Disney parks including the Epcot food and wine festival, we're also going to spend a significant amount of our time at the Universal parks. We like to visit in October to see Universal's excellent Halloween Horror Nights evening hours and we're also looking forward to seeing the new Harry Potter section of the Islands of Adventure Park.
When we return I'm hoping to finish up my second platoon of German Pioneers that are on my painting table now so that I can start work on my British early-war forces.
Tuesday, October 12, 2010
Mid-life Crisis
This is the seventh Ford Mustang I've owned. The title of this post is somewhat of an inside joke since I've been driving 'mid-life crisis cars' all of my adult life. My other running joke is that I buy a new Mustang every 10 years whether I need it or not. My last one I actually kept for 11 years. I was overdue!
This is a 2011 Mustang GT Premium in Kona blue. It's basically stock: 412 HP V-8, 6-speed manual transmission, leather interior, Microsoft Sync, Shaker 500 sound system. I did add a few performance options: 3.31:1 rear-end gear ratio, 19" alloy wheels and Pirelli Z-rated tires. I opted to go for a clean look without spoiler, hood scoop, side scoops, window louvres, pinstripes or side graphics. The 5.0 on the front fender is all the decoration this car needs.
I know this doesn't have much to do with wargaming, but I wanted to have the photos somewhere that my friends could see them. There is one part of this that is related to wargaming, and that's what to get for a vanity license plate. Here are the current leaders: 'WARGAME', 'WRGAMES', 'SOPWITH, 'AJSGT50, 'ALSTANG'. Which do you like?
Update: My friend Michael took these photos after work yesterday with his high-end camera. Michael is a much better photographer than I am as shown by his photos.
Saturday, October 9, 2010
Early War Escalation League (2)
Today we had our third meeting of the early war escalation league at Adler Hobby. This was our second gaming day and we were able to play two 800-point games. In addition to the games, store owner Gordon started us off with a demonstration on how to use Windsor & Newton's brush cleaner and restorer to revive old and clogged brushes. Pictured to the left is a brush cleaning station with some of Gordon's 'snake oil' in use. I have to say this is some fantastic stuff and Gordon let us try it out on our own brushes and I was impressed at how well it brought brushes back to life, removing even the paint dried and clogged in the base of the brush's bristles. I brought a bottle home for later use. Good stuff
Here you can see my 15mm steppes house on a table beside some resin 15mm eastern front buildings. I think the scale is a pretty close match. My painting style is obviously significantly different than the one used on the resin buildings, but I was happy with the way the sizes matched up. With a little more work I can probably come up with a few variants, enough to make a small village.
Below are photographs from the first game. This one pitted a German light panzer company against a French heavy tank company (sans Char-B tanks). This was a closely fought battle who's outcome swung from a 6-1 French victory to a 6-1 German victory based on the result of a single platoon motivation roll on the last turn. It's nice to see two forces so closely matched.
Below are photographs from the second game which pitted my German light pioneer company against the same French tank force. Since only three players had forces ready to play with we opted for two blue on red games.
This was a fairly one-sided game with me not doing so well. I had similar problems finding an answer to all-armor forces at this low point total as I did with 600 and 1000 point games with my late war Finish infantry company. Early on I had some success with my artillery, but when it came to assault time my one platoon of infantry was no match for two platoons of French tanks with their fist fulls of machine gun dice. Hopefully as the points escalate higher in the league things will shift closer to parity, but for now I'm still having trouble understanding how to play infantry vs. armor in this rule set. I know it's effective, with the right player commanding the infantry, but so far I haven't obtained the necessary skill set to make it work. The good news is I'm very close to completing my 1750-point pioneer company.
After I finish the German pioneer company I'm working on, I'm going to start working on a British infantry tank company. I'm sure once I'm pushing an all-armor force, I will be able to better understand how it can be beaten by enemy infantry as I see this match up from the other side and receive the beatings I so obviously deserve.
This was another great day of gaming and an enjoyable way to spend a Saturday afternoon. If anyone is in the southern NH area and is interested in trying out early war Flames of War it's definitely not too late to join in. We're scheduled to continue playing 600-point forces for quite a while, and getting 600 points worth of troops painted up is actually a very easy task.
Here you can see my 15mm steppes house on a table beside some resin 15mm eastern front buildings. I think the scale is a pretty close match. My painting style is obviously significantly different than the one used on the resin buildings, but I was happy with the way the sizes matched up. With a little more work I can probably come up with a few variants, enough to make a small village.
Below are photographs from the first game. This one pitted a German light panzer company against a French heavy tank company (sans Char-B tanks). This was a closely fought battle who's outcome swung from a 6-1 French victory to a 6-1 German victory based on the result of a single platoon motivation roll on the last turn. It's nice to see two forces so closely matched.
Below are photographs from the second game which pitted my German light pioneer company against the same French tank force. Since only three players had forces ready to play with we opted for two blue on red games.
This was a fairly one-sided game with me not doing so well. I had similar problems finding an answer to all-armor forces at this low point total as I did with 600 and 1000 point games with my late war Finish infantry company. Early on I had some success with my artillery, but when it came to assault time my one platoon of infantry was no match for two platoons of French tanks with their fist fulls of machine gun dice. Hopefully as the points escalate higher in the league things will shift closer to parity, but for now I'm still having trouble understanding how to play infantry vs. armor in this rule set. I know it's effective, with the right player commanding the infantry, but so far I haven't obtained the necessary skill set to make it work. The good news is I'm very close to completing my 1750-point pioneer company.
After I finish the German pioneer company I'm working on, I'm going to start working on a British infantry tank company. I'm sure once I'm pushing an all-armor force, I will be able to better understand how it can be beaten by enemy infantry as I see this match up from the other side and receive the beatings I so obviously deserve.
This was another great day of gaming and an enjoyable way to spend a Saturday afternoon. If anyone is in the southern NH area and is interested in trying out early war Flames of War it's definitely not too late to join in. We're scheduled to continue playing 600-point forces for quite a while, and getting 600 points worth of troops painted up is actually a very easy task.
Friday, October 8, 2010
Reinforcements!
These are additional reinforcements for my Flames of War early war German Pioneer company. Since I've been painting figures as I can get them I had several incomplete platoons. This is a section of 10.5 cm howitzers and a squad of pioneer infantry. Both of these will complete previously painted partial platoons. All miniatures are Battlefront (FOW) figures.
Two 10.5 cm leFH18 howitzers. These bring my previously painted battery up to the full strength of two sections (four guns).
Three stands of pioneer infantry. Since Battlefront hasn't released the correct figures for early war pioneers yet this squad was assembled by converting some Finnish pioneer figures I had and adding rifle-armed German infantry figures from a mid-war blister. This squad brings my previously painted platoon up to the full strength of three squads (nine stands).
Sorry there's not much more exciting to say about these, since they're just completing already started units. Still, I painted them, so they're blog-worthy!
Sunday, October 3, 2010
Corner Ruin (2) and Steppes House (2)
Here is my corner ruin painted up. I think I need some more orange and brown in my brick color, but this at least shows off the engraving detail for the mortar lines in the brickwork as well as the window frame details. I've scattered some grit and debris around the ruin but it could probably use a lot more. I have a second one on the table with some more debris on the ground and on the wall sections as well. Sometimes my computer modeling skills exceed my real-life modeling skills.
You'll notice some battle damage not shown in my previous post. I thought about adding some machine gun holes using the laser, but I feared that the pieces would become too regular that way. Instead I opted to allow the modeler to add their own. Machine gun holes can be added with a small drill or by simply spinning the tip of your hobby knife. Larger caliber holes I made with a cone-shaped rotary tool grinding bit. I think both types add character to the piece. My only regret is I didn't add any to the inside walls. The last photo shows a Flames of War command stand inside the ruin to give a sense of scale to the piece.
Steppes House (2)
Back in April I posted my first attempt at making a 15mm steppes house for use in Flames of War games. That first attempt was way out of scale for 15mm. In fact it was pretty much spot on for 28mm scale so I gave it to my friend Byron as a gift for use in his Russian Civil War games.
This is my second attempt. I re-used the original CAD files and re-scaled them down to what I think is a proper 15mm scale. Instead of the three full stands of infantry the original held, this one holds a single stand of infantry, two command stands or if you want to let your bases overlap about 1/8" you can fit a stand of infantry and a command stand as shown in the photo below.
As in the first version, the thatched roof is made from synthetic 'teddy bear fur' material which is attached to the removable roof with contact cement, then saturated with white glue. After dry the roof was painted a base color using spray paint followed by two passes of dry-brushing to bring out the detail. The window and door frames are made with my laser from 1/64" plywood and glued in place. After that the entire building was given a light coat of textured spray paint to give the stucco texture. After that dried the house was painted like any other model with a base coat followed by a couple dry brush passes. After painting I realized I should have spent a little more time sanding the building before painting as the base panel shows up a little more than I'd like.
Labels:
Flames of War,
Lasered Items,
Terrain,
WWII
Saturday, October 2, 2010
15mm Corner Ruin Terrain
This is something I've been working on lately. It's a 15mm terrain piece that's supposed to be a ruined corner of a building. I've modeled it up to fit on a 2"x2.25" base which also happens to be the size of a Flames of War objective marker. My thought is this could be the starting point for a modeler to make a nice objective marker while also being able to be used as a terrain piece. This is a proof of concept. I'm hoping to make up a few different variations of this with the ability to assemble multiple versions on larger bases to make full ruined buildings or possibly even city blocks.
The entire piece is made with my laser using 1/8" thick 3-ply Baltic birch plywood. The brick texture is engraved deep enough to show up using dry-brushing painting techniques. I've also engraved floor boards on both the base and the second story remains. I'm currently painting up a sample which I hope to be able to show here soon. For those wishing to use 'official' flames of war bases, the index tabs on the walls can be cut off with a saw or rotary tool or with a little persistence even a hobby knife.
Friday, October 1, 2010
Dog Tags
I made up these sample dog tags on my CNC laser engraver. We're going to use them at Adler Hobby on their battle 'challenge' board. At some point I'll be making one up for each player in our escalation league. I'm just posting them here so other players in the league can see them and hopefully become motivated to send in their information.
This is another example of custom wargaming work I can do in the laser. If you have something you need made for your games feel free to drop me an email and I'll be happy to discuss your project with you and give you a quote on the job.
Subscribe to:
Posts (Atom)