Tuesday, May 26, 2009

Board Gaming

In addition to historical miniature gaming, I also like to get together with a group of friends to play 'Euro Game' boardgames. We used to get together every Saturday afternoon/evening for a long while, but eventually our schedules started interfering with that. Since then we settle for getting together for a Saturday anywhere between one and three times a year. We call these game days 'conventions' just for fun, named after the host. This past weekend I had a great time board gaming at Combscon 2009 redux. You can read all about it over at my friend Scott's boardgame blog - The Settlers of Dune.

If you're a miniatures gamer, don't overlook our hobbies origin - board gaming. Board gaming is still alive and popular in Europe. The European game designers are putting out some amazingly fun games. Our group prefers those based on economic or rail themes, but if you're looking for military boardgames, they're also still being developed. My favorite resource for board game information is the Boardgame Geek website.

Monday, May 18, 2009

First Field of Glory Game

Until now my experience in the world of ancients gaming has been fairly limited, consisting of mainly DBA and big-battle DBA/DBM games as that's what the ancients aficionados in our club prefer. Recently some of the ancients gamers in our club have been trying and enjoying the new Field of Glory rule set. One of my club mates, Charlie decided to start up an ancients campaign revolving around Hannibal's invasion into Italy during the second Punic wars. During our annual First man of Rome DBA tournament this past March I was the winning Roman player and current holder of our First Man of Rome trophy, so I felt obligated to represent Rome in the campaign with my fellow Roman commander, Mike Coppinger. Opposing us are Michael Bailey as Hannibal, and Randy (King Jubba) Fields as co-general of the Carthaginian forces. This was the first conflict of the game, with Hannibal's large army catching the defenders of Tarentum isolated. This created a game with Hannibal's army having a large advantage in numbers, almost 2:1.

Here we can see Hannibal's forces, marching onto the field of battle. They're an impressive force with a large cavalry arm, Galls, Psoli, and almost as many imitation legionaries as the Romans have true legionaries. Our only advantage at this battle was the terrain. There was one choke point on our side of the board, and just like a scene out of 300, we chose to defend that point and force the Carthaginians to attack us in waves, rather than allowing them to outflank us. At least that was the plan....


Here the much smaller Roman army marching onto the field of battle. We deployed the majority of our skirmishers out on our right flank, while the rest of the army marched on between two woods, hoping to beat the Carthaginians to the town directly ahead so we could anchor our flank on it.


This is a photo midway through the battle as our line has reached our goal and deployed to receive the Carthaginian attack. Guarding our flank in the woods are several units of skirmishers. In the town on our left a single unit of skirmishers with cavalry and Triarii in reserve behind the town. At this point it was time to wait for the assault to begin and try to survive the onslaught.


During the initial melees, we fared pretty well, giving as well, or sometimes a bit better, than we received. My co-general Mike Coppinger did a masterful job of defending the woods on our right flank from multiple assaults, but eventually the Carthaginian numbers weighed in there and our defenders in the woods started to get eliminitated, unit by unit. In the center we were able to repluse all of the Galls, but when the Carthaginian heavy infantry hit our line which was softened up by the Galls' attacks, our units began to fail. This photo was taken just before we called the game. Although our army broke, we felt good being able to inflict similar numbers of casualties on a numerically superior force. Hopefully in our upcoming battles we can campaign our way into fights where the numbers are slightly more equal. Hannibal won this battle, but the war is far from over!

I've posted several more photos from the game on the Northern Conspiracy's Past Events page. So what were my first impressions of Fields of Glory? I liked a lot of the mechanics and the combat resolution seemed straight forward and easy to understand. The disruption/disorder system still confuses me a bit, and I think that the casualty and morale mechanics are quite 'dicey', i.e. the rolls of the dice tend to impact the results more than the tactical situation does. All in all I think they're worth consideration for larger ancient battles. I'm going to get a copy of the rules of my own so I can better understand them. The rulebook is a wonderfully illustrated hard cover book which seems more than worth the cost. I'm looking forward to future games in the campaign.

Monday, May 11, 2009

Tournament Game Night at AJ's

Last Friday night I had a few friends over and we played two more of our Napoleonic tournament Volley & Bayonet Road To Glory games in my basement. I split my 6'x12' table into two 6'x6' tables (it's designed to do this for just such an occation, or for double-blind games). On the far table Ed Mueller (standing) and Bob Ouelette (sitting) played their game, and at the close table Phil Hammond and I played our game.

Ed's French army ended up narrowly edging out Bob's Austrians in a close-fought chess match. I was mostly focused on my game which pitted my Russians against Phil's French army. Our game was a back and forth slugfest for most of the game in stark contrast to Bob and Ed's game. I've been requested to keep the photos to a minimum, so for those interested in seeing a lot more photos, particularly of Ed and Bob's game, you can go to the Northern Conspiracy's events gallery where I've posted all the photos I took.

Here's the after-action report for my game against Phil:

Our initial deployment cards were very similar mirror images of each other with both of us losing our right wing and our reserves at the conclusion of turn one. Although it was initially difficult, I was relieved to see that Phil's troops returned to the table a turn earlier than mine, which meant I most likely could count on a slight (1/2 point) advantage in starting victory points. This wasn't enough for me to go full out on defense, but I did assume I had the luxury of making cautious attacks.


About half way through the game, I have had to throw two of my cavalry divisions up against Phil's Swiss guard, which routed two of my Musketeer brigades on the Swiss guard's first charge. After a couple turns of cavalry charges I finally exhausted Phil's guard, and withdrew my bloodied cavalry divisions, each with only one exhaustion point left. I was able to stabilize the left flank with portions of two different infantry divisions pulled from the center and returning right wings, all commanded by the wing commanders and CinC. This photo shows the flank just before the final Russian cavalry charge that exhausted the Swiss guard.

I chose to post this photo as it shows the turning point in the game, where my remaining cavalry division (on the far table edge) makes a fient towards Phil's line of communication (LOC) while my Cossack division screens Phil's infantry that was attempting to guard the flank. This was a 'trick or treat' moment I presented Phil - follow the battle cavalry or attempt to range shoot the Cossacks in hopes of an easy victory point. Phil chose the latter, but the Cossacks survived his ranged fire.

This is the following turn. As you can see my cavalry has charged Phil's infantry in the rear, and with the Cossacks to the infantry's front the infantry had only one way to run when they lost the melee with the cavalry. This congestion cost them dearly with all three brigades ending up in rout, squeezing out towards my lines. Although the fresh infantry didn't exhaust from this, I was able to finish the job a few turns later by following up with my infantry.

In the left-center my guard infantry (with the yellow marker) didn't fare as well and two turns after this Phil's French line infantry counter-charged my guard and destroyed them in detail in one of the bloodiest turns of V&B I've ever seen. In two combats we each scored 6 hits on each other's units, the equivalent of 3,000 casualties in 30 minutes of fighting. The casualties remained fairly even for the rest of the battle and I edged out a victory, the difference in points was approximately what it would have cost me had I lost the 2 extra points on the two cavalry divisions that fought early in the battle. Phil fought an excellent battle and we both had a good time rolling fists full of dice most of the night.

This is a photo of the aftermath of Ed and Bob's game. As you can see it is a much more orderly affair with the difference beeing the exhaustion of Bob's converged grenadier division (marked with the red marker in the far center of the table). Ed and Bob had a fun time playing the "thinking man's V&B". That's the great thing about these rules. They don't dictate a particular play style. They're flexible enough to work under many styles. Also noteable in this photo is Bob's table felt, which he purchased from Hots Artworks. It's quite nice and makes a great travelling table cover.

Monday, May 4, 2009

American and French Officers

I needed some additional wing commanders for the Yorktown game I put on last month (see my earlier post for an after action report of the game). Yorktown is a large battle with multiple American and one French wings. I had many brigade commanders, which in V&B are represented by a single mounted officer, but only one army/wing commander, with the obligitory General George Washington on it. For the game I painted up these two American and one French command stands in a couple of evenings, one to paint the figures, and one to base and flock the stands.

The figures are a mix of American and British mounted comanders by Old Glory. I chose to use the 'standard' late war continental uniforms for the American generals and tried to use the more 'flamboyant' poses for the French officers. I hadn't posted any of my painting recently and I didn't want everyone to think I'd stopped painting just because I've been playing so many games.

In a future post I'm going to show my 15mm ACW re-basing project that I'm about half way through. I'm changing from Fire & Fury to Volley & Bayonet for this army.

Tuesday, April 21, 2009

Another V&B Road to Glory Game

I received the dreaded 'bye' in the second round of our small tournament and had to sit out while the other competitors had fun in their rounds. In order to speed things along, the organizers released the rest of the pairings for the tournament in order to allow those that wished to, to play their later round games when it was convenient. For my 3rd round opponent Ed with his middle French army featuring a very high-quality cavalry arm and I, last Friday night was a good time for a game.

Above you can see both of our armies deployed before the start of turn one. Our armies are very similar in quantity and quality of infantry, with maybe a slight edge in favour of my Russians. Artillery was fairly even with Ed outnumbering me 3:2, but my guns were heavies which out ranged his field battalions. For cavalry, if you ignore my division of Cossacks (and who wouldn't), Ed had a decisive advantage, matching me stand for stand in quantity, but besting my Russian troopers in all measurable quality metrics (strength points, morale level, exhaustion and cavalry weight). From the beginning I believe we both knew that the battle could hinge on how the cavalry battle worked out. I hoped to try to shield my inferior cavalry with my infantry and allow my advantage there to with the day for me, but Ed wasn't about to let me off that easily.

During his half of turn one, Ed moved aggressively forward across his whole line. Knowing that my left and reserve wings were returning detachments that would have to leave at the end of turn one, I chose to deny my right flank (opposing Ed's strong cavalry), and deploy my center anchored somewhat on a dense forest with my small guard division as my only reserve. To my surprise at the end of the turn all but Ed's right (to my left) wing were removed to also return later on as returning detachments. Ed's aggressive advance worked and fooled me into not advancing when I actually had the upper hand. The one command I was sure was going to stay on the field of battle (Ed took an unusually long time working on its deployment) was the only command left.

Ed's detachments returned earlier than mine did and he chose to try to outflank my left flank with his original infantry which held up well to my initial assaults, while deftly deploying his first returning wing in his center just in time to deploy a solid line of battle from which he would launch attacks against my line with the French middle guard. On my right Ed cleverly chose to deploy his Bavarians (French provisinal constript troops of slightly lesser quality than the majority of his arny) in a town to secure his flank while the bulk of his cavalry started to outflank my infantry. Forced to respond, I took all of my cavalry and shifted them to answer the threat. Just what Ed wanted. I knew I was bringing a knife to a gunfight but I didn't have any other answer.

On the left flank Ed's original infantry division and my center infantry division mutually exhausted each other in our respective turns, turning that flank into a somewhat comical you shoot me in the flank/rear, I shoot you in the flank/rear until after a turn each I withdrew my troops (without the benefit of Leger reinforcing skirmishers) to a line of battle near my unexhausted Guard Jagers. In the center my Guard held up to the initial charge of the French Middle guard and on their countercharge routed one of the French stands, and with the morale collapse of the small division, permanently disordered the other stand. We were both content to conduct ranged fire in the center, neither of us relishing the task of breaking the other's stationary line. That left us to the flank with the cavalry on it where Ed had forced me into the fight he wanted, cavalry on cavalry, or so he thought.

This photo shows the result of the first round of the cavalry battle. I charged one brigade of Ed's curiassers with two of my cavalry brigades (hussars and dragoons) while at the same time supporting them with two stands of infantry firing on the Curiasser's flank. Alas, it was not to be and my 15 dice scored one hit and Ed's four dice scored two. My cavalry recoiled and before Ed's heavies in disorder - an easy target. Further along I faired better besting Ed's dragoon division and exhausting it but also exhausting one of my cavalry divisions in trade. At the extreme right my light cavalry division (including the Russian guard lights) threatened Ed's position but chose not to charge home.

In Ed's following bound he finished off my disordered cavalry division near the town by killing them to a man, while also collapsing their morale (an additional scenario VP for Ed). Unfortunately for him this put him behind my lines and within striking distance of my infantry. On my following turn I charged my remaining non-exhausted hussar stand stationed adjacent to the town (other than those in the cavalry division holding the extreme right flank) at his Curiassers and brought an additional 5 stands of infantry to bear using small arms and dedicated guns. All that firepower was enough to eliminate the French heavies. With this flank in danger Ed thoughtfully withdrew his remaining Hussar division to guard his flank, while I pursued it with my cavalry and pressed the flank with a division and a half of my army commanded by the CinC and one wing commander.

The final three turns were spent with me pressing Ed's exposed flank to try to capture his line of communication (LOC). Capturing the enemy LOC is an additional victory condition in out tournament. Ed's Bavarians proved to be sturdy due to their entrenchment in a stone-walled town, and his remaining cavalry division and additional corps cavalry brigade did prove to be quite difficult in defence, but the coups-de-grace was when my infantry held to a combined charge of all three of these cavalry brigades repulsing Ed's cavalry and leaving them vulnerable to my cavalry, which made short work of the disordered horse. In the final turn Ed had just enough 'speed bumps' to keep me off his LOC, but the cost of the delaying action was his last cavalry division, which ended up in morale collapse and afforded him a loss greater than the LOC the cavalry was expended to protect.

This was a fantastically close game, fought down to the very last roll of the very last turn. Despite some things we still are unsure we like about the 'new' Volley & Bayonet rules, it's still generating games that are great fun. I'd like to thank Ed for being a good opponent and a great sport.

Wednesday, April 1, 2009

Yorktown Game OB

I've had a few requests to post the Volley & Bayonet Order of Battle for my Yorktown game. You can click the link above to download it in PDF form.

I have to make a few caveats about this OB. First it's a hypothetical scenario BASED on the troops that were at Yorktown. I've altered things significantly from history in order to make it an enjoyable set-piece tabletop battle. Second, since it's only been played once, there are still adjustments I feel could be made to make it a better and/or more historically accurate game. I've tried to note some of these in my notes in the OB file. Finally this is a wing-scale battle. The current in-print edition of Volley & Bayonet doesn't include the alternate scale rules that this battle requires. Instead you can get them from the Volley & Bayonet Yahoo group site, or from my blog archive here.

The points listed in the order of battle are calculated using the Volley & Bayonet Road to Glory Points System. (available courtesy of Keith McNelly's excellent Volley & Bayonet site).

I used the following victory conditions: American players received 1 point for each exhausted British brigade and 2 points for each collapsed, destroyed or captured British brigade. Captured was defined by any British unit remaining within the American encirclement at the end of the battle. The British received 1 point for each exhausted American brigade, and 2 points for each British brigade that could pass through the American lines and/or exit the table. If you play the game and have any suggestions on how to improve the scenario I'd be thrilled to hear from you!

Wednesday, March 25, 2009

Yorktown Game

I've been wanting to do an alternate history game for the battle of Yorktown since visiting the battlefield last spring. For anyone who hasn't taken the time to see the battlefield, it's one of the most well-preserved AWI battlefields, which is surprising considering its prime waterfront location and expansive size. If you match your Yorktown trip with side-trips to Colonial Williamsburg and the Jamestown settlement it makes for a fantastic vacation that will entertain even those people without a strong interest in military history.

Since Yorktown was basically a siege, it doesn't make for a great tabletop game, unless you want to make some elaborate siege rules. Instead I am working on this scenario and have opted for an alternate history that evens up the forces enough for the British to attempt a break out through the American lines. This first try at the scenario was run in my basement with some friends from the Northern Conspiracy. The scenario makes the assumption that Cornwallis has received advance warning of the incoming French fleet and has reacted to this by successfully feinting an evacuation to Gloucester point which has drawn the bulk of the French forces there. The remaining American force with just a small detachment of French give the British at Yorktown an opportunity to attempt a break out.


These photos show the troops positions during the British half of turn one. The Americans have advanced in depth, while the British advance out of the Yorktown breastworks, echelon right, hoping to concentrate their forces against the American left flank while having the Hessians hold the British left flank. Since this is a breakout game, the table is used lengthwise, allowing for a running battle.

The cream of the British forces, the Guards brigade (I had to substitute Grenadier stands to represent some of the guards) and the Light Brigade advance on the right of the British line. Still to be moved from the works are the remaining British line troops. Just out of frame the German troops can be seen advancing from the works.


The American defensive lines await the British attack. Note the small French reserve blocking the road behind the woods which is one of the two possible British evacuation routes.

I had to paint three more wing command stands, each with two mounted officers on them for this game. I'm hoping to get proper photos of them for an upcoming update to the Blog.


The British main body just before the first attacks go in. It's an impressive sight! Just out of frame to the left and slightly behind the main British force are the slower-marching Germans. This photo gives a good view of the on-stand roster labels we use which are color coded by brigade (in this case) or division depending on the scale of the battle.


The British Guards brigade and Light Brigade charge home early in the game. Although the British elites had good success, the Americans were causing them considerable damage during the attacks, whittling away at their strength.

In the woods, the first line of retreating Americans can just be seen. In the center the American line held up to the first attacks.


Later in the battle, the left flank of the American lines has been driven back by the British Elite brigades, but at a cost that is too high to sustain. Both the Guards and Light brigades are near exhaustion with probably one good charge left in them. In the center Yorke's brigade has also sustained significant damage and faces fresh French reinforcements.


On the left flank the Germans engage the American right but are held off or driven back while sustaining significant casualties. The German battalion guns do not seem to phase the Americans at all.

We had a good game. My friend George thinks that the American players used a very historical defense for this part of the war and it was as effective on the tabletop as it was historically. For adjustments I may make some troop quality adjustments on the American side, which may effect their durability somewhat. Also the British may have more success fighting across the entire line instead of concentrating on one point which allows the Americans the advantage of defending in depth. Another fight of this scenario will definitely be on the schedule for the future. Everyone present had a good time.

I'd like to thank those who played for being understanding of the fact that this was a first try at a new scenario. Everyone took it in stride and had fun. Thanks guys!

Saturday, March 14, 2009

V&B Road to Glory Game

Some of the members of the Northern Conspiracy are using the new Volley and Bayonet Road to Glory battle generation system to play a small club tournament. We're using 3000 point armies with all of the French players playing games against all of the other players (playing armies of Prussia, Russia, Austria and England) in a round-robbin style tournament. This was my first game, and I drew my friend Robert as my opponent. Robert was using an army built from the Middle French list and I was using an army from the Middle Russian list. Our armies were similar in construction with two exceptions. The first was that Robert chose to build his divisions from provisional conscript troops which while a lower quality, allowed him to have several more divisions than I had. I chose to have two heavy batteries in my army. Both Robert and I had a guard division and dedicated guns attached to all of our line infantry.

The battlefield as chosen by both Robert and myself. Our tournament rules call for a DBA-ish method of alternating placement of terrain pieces. We both wanted a similar amount of terrain so placement was quick and easy. Terrain features were a wooden-walled town, two forests and two gentle hills. We diced for sides and Robert got the North side (top of the photos) and I got the south side.


Initial deployment of both armies. Both the French and Russian players decided to deploy their reserves on the east deployment zone, which hinted of things to come...


Russian turn 1: We didn't know who was supposed to move first so we diced for it. I won the roll so I started. The Russian turn one move was to advance across the line with my right wing in a slightly denied position with the reserve cavalry on my extreme right flank and Platov's cossack division in reserve.


French Turn 1: The left (east) French wing is removed at the end of the turn. The French reserve protects the army's eastern flank and LOC. The right (east) Russian wing is remvoed. Both players drew similar deployment cards but on opposite flanks. The French attacked the Russian line in the center with mixed results, routing one brigade of Russian Musketeers with the Young guard, pushing back one brigade of Russian musketeers, but recoiling in two other locations due so the heavy support fire from the Russian batteries. On the west flank a division of French provisional conscript infantry advances to press the Russian flank.


Russian turn 2: Russian counter-attacks on the right-center and center were successful, but required the victorious brigades on the right to form square after winning the melee. Most of the deployed Russian brigades and the two heavy batteries went stationary and one brigade occupied the town. On the far western flank Russian cavalry pushed back the provisional conscript infantry division that was testing that flank. On the Eastern flank both commanders were happy to maintain a safe distance without combat.


French turn 2: On the west flank French cavalry counter-attacked the Russian cavalry division with devastating results, exhausting it and causing it to suffer morale colapse. The Young Guard just east of the town routed another brigade of Russian musketeers and on the eastern side of the battlefield near the woods a provisional conscript division routs one of the Russian brigades near the woods forcing it through the woods and out the other side causing the other musketeer brigade and some cossacks (who were bravely hiding in the woods) to become disordered.


Russian Turn 3: The Cossacks exited the woods to screen the routed and disordered Russian infantry on both sides of the woods. The exposed Russian brigade to the left of the woods retreats and reforms behind the cossacks. On the west flank the returning Russian detachment arrives, jut in the nick of time and advances to fill the hole created by the destroyed cavalry division. In the rear, Russian troops begin forming an ad-hoc last stand reserve from routed and collapsed divisions under the command of the left wing commander.


French turn 3: The Young guard pushes back the Russian guard Jager brigade and occupies their position in a position to exchange ranged fire with the deployed Russian line, avoiding the heavy artillery. The French cavalry retreats from the eastern flank further. In the center, the French withdraw out of range of the Russian batteries.


Russian turn 4: The Russian returing wing is forced to fill the hole that the (now exhausted) Russian Guard division has left in the center of the line. At the far western flank the Russians mount another cavalry charge with a fresh cavalry division beating and exhausting the French cavalry. This buys more time on that flank, but at the expense of nearly exhausting the Russian cavalry in the process.


French turn 4: The returning French detachment wastes no time in jumping into the fray. The light cavalry brigades shake out into skirmish formation and dispatch the Cossacks, killing two stands, which exhausts the Cossacks. In addition to the returning detachment, an exhausted provincial brigade which advanced to support the French cavalry charge with ranged fire is disordered by their own cavalry when it routed after charging the Russian cavalry.

In the center the Young guard makes its final close assault of the battle, dispatching another brigade of Russian musketeers but in the process finally receives enough hits to exhaust themselves. They were done close assaulting, but proved to be dangerous for the rest of the battle causing several more casaulties through ranged fire. Behind them another French division assumes a flanking position threatening what remains of the Russian line.

On the far left, infantry range fire repulses the remaining Russian cavalry, exhausting it and collapsing its division's morale.


Russian turn 5: The Russian's counter-charge on the eastern flank destroying a French cavalry division and sweeping up the disordered infantry division in a rout. In the center the Russian right battery hand pushes to provide better firing lanes to its left. Two Russian infantry divisions charge the rear of the flanking French brigades, but with only partial success: one Russian division is replused and left vulnerable to French cavalry counter-attacks, the other destroys the French brigade it attacked


French turn 5: On the east flank the French infantry conduct aggressive range fire on the Russian cavalry but do not inflict significant damage. In the center the expected cavalry and infantry counter-charges rout the two disordered Russian brigades there. On the west flank the provisional conscript infantry brigade relentlessly returns to press the crumbling Russian left flank.


Russian turn 6: The Russian cavalry on the east flank withdraws, in hopes to support the center while the French infantry has to make it's way around the woods to continue to press the attack. In the center the Russian batteries finish destroying the last French stands in range, and some Russian brigades are rallied and thrown into the gaping hole in the Russian line. On the western flank the Russians abandon their prepared lines, about face, and charge the flanking French infantry in flank routing it. With additional ranged shooting the Russian invalid reserve completes the exhaustion of that French division.


French turn 6: On the east flank the French advance, choosing to send one division east of the woods and one west of the woods. In the center, all of the non-exhausted French divisions choose to remain out of range of the Russian heavy artillery. From the center to the west flank, the remaining French divisions are all exhausted, but continue to agressively conduct ranged combat with good success, causing an additional Russian exhausted cavalry division to finally collapse as it is destroyed.


Russian turn 7: On the east flank the remaining exhausted cossacks take refuge in the woods. The reserve cavalry deploy to protect the exposed flank of the Russian battery. On the left the remaining non-exhausted Russian brigades return to reform their original line and conduct ranged fire on the cavalry and infantry there.
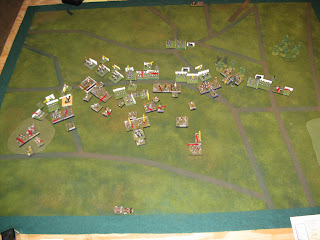

French turn 7: On the east flank the French infantry continues to advance and fires on the Cossacks that are bravely hiding in the woods, but do not cause any casaluties. In the center, the other returning French reserve division routs one of the Russian batteries in an agressive frontal assault. Across the rest of the line range shooting is exchanged.


Russian turn 8: The cossacks make a predictable break for the French baggage train (LOC). The Russian cavalry exacts revenge on the French brigade that routed their battery by destroying them in a countercharge aided by range fire from an exhausted Russian guard brigade that advanced up in support of the combat. Also in the center the other Russian battery and stationary infantry combined their fire and destroyed an additional French brigade, exhausting another French division. On the left the non-exhausted Russian division exchanged fire with exhausted French troops trading casaulties -- not something they enjoyed doing this late in the battle.


French turn 8: The French continue to press the east flank, but they choose to egage the skirmishing Russian cavalry in ranged combat rahter than charging them, hoping to inflict casualties rather than just chase them away. In the rear the French form up an ad-hoc division of exhausted cavalry to entertain the cossacks, who don't really have the stomach for a fight. The other non-exhausted French division advances along the road behind the French lines, hoping to engage the non-exhausted Russian division that is anchored on the town.


Russian turn 9: The russians limber up their artillery and re-deploy their center division to face the flanking French division while simultaniously supporting a cavalry charge of a pesky French brigade that was sniping at the cavalry. This attack destroyed the French brigade, collapsing it's division's morale, and clearing a hole in the center.

On the west flank the non-exhausted Russian division tires of trading casaluties with exhausted French troops and abandons the town and the line of defense there and withdraws towards the center, leaving some exhausted Russian infantry and cavalry to skirmish with the exhausted French there.


French turn 9: The french division on the east flank turns right and deploys near the woods denying flank towards the Russian cavalry. The non-exhausted french division in the center forms line of battle towards the Russian center. Skirmishing continues between the rest of the exhausted troops with the French inflicting more casualties, eliminating a Russian Jager brigade.


Russian turn 10: The Russians complete the reformation of their lines with the center division and artillery on the right, and the left Division on the left and one cavalry brigade in reserve. Russian cavalry charges through the gaps in the center routing a solitary French brigade and deploying the Russian guard cavalry in a position to threaten the French LOC. Outside the Russian central lines the remaining exhausted Russian riff-raff deploy in a second line to soften up the approaching non-exhausted French division in the center and to keep the exhausted French from skirmishing with their steady troops.


French turn 10: The French, not wanting to stay in front of the Russian guns move their right-most division towards the center in hopes to join up with their center division. Their center division charges the Russian riff-raff, eliminating one Russian brigade, but amazingly are repulsed by the other disordered Russian brigade.

In the French rear, the French cavalry attempts to surround the Russian cavalry there to force it to charge them, but since the French are exhausted they are unable to charge home, and must instead settle for harrassing the Russian cavalry.


Russian turn 11: The Russian guard cavalry charges a disordered French skirmish cavalry stand, which fails morale and routs. The Russians mount a four-brigade attack on the French division with the Russian guard cavalry covering the third of four sides. The Russians win both melees, forcing the division to rout en-masse and subsequently suffer morale colapse which elimitates the two routed stands.


French Turn 11: (sorry no photo) During the French turn 11 turn the French consolidated their remaining non-exhausted division and continued skirmishing with the other French troops, but after this turn we called the game.

The Final Score: I have to say, the scoring system we're using (which is an alternate system posted on the V&B mailing list and not the Road to Glory scoring system) rewards larger brigades. Robert's army gave my army fits at every turn and I felt on several turns that I was on the verge of total army collapse due to him having fresh non-exhausted available in a seemingly endless supply. Unfortunately since our scoring system awards points for exhausting and collapsing divisions, these smaller divisions offer up more available points to your oponent. Our system is scored like golf, with the lower score winning. The score was Robert (French): 23 points Allan (Russian) 12.5 points. Honestly I felt that the game was a very marginal victory for the Russians.

As an aside, if we scored this battle by the Road to Glory system, the Russians would have won 4-2 at the time we called the game as I controlled my own LOC and 3 un-exhausted wings, and Robert controlled his LOC and one un-exhausted wing.

I had a good time, and Robert was very gracious about the outcome, even considering his army gets what I feel is an unfair 'shake' in the scoring system.