On a recent post one of my readers asked me to do a step-by-step tutorial of my basing method. While I don't think my bases are as nice as some of the best seen on wargaming blogs, they're passable and my technique is super easy and super fast. I know a lot of wargamers dread basing, but with my method I find it quite easy and enjoyable. By request here is my method.
Step 1 - Prepare the base and Figure

I prefer 1/4" thick bases for my 28mm figures. The thicker bases give the player something other than my figures to grab onto. On my AWI armies I paint the whole base black with spray paint then hand paint the top Russian Green using cheap craft paints. For Napoleonics and Ancients I smartened up and paint the top and edges of the base with green spray paint from a can. I buy the cheap stuff at the department store for this use. The slots in the back of my bases are for labels and/or roster tags.
When I'm painting my figures I make sure the base of each figure is neatly painted with Russian green paint. An exact match to the bases isn't required, but the closer the better. Dry-brush the base if you like.
Step 2 - Prepare Talus / Stones
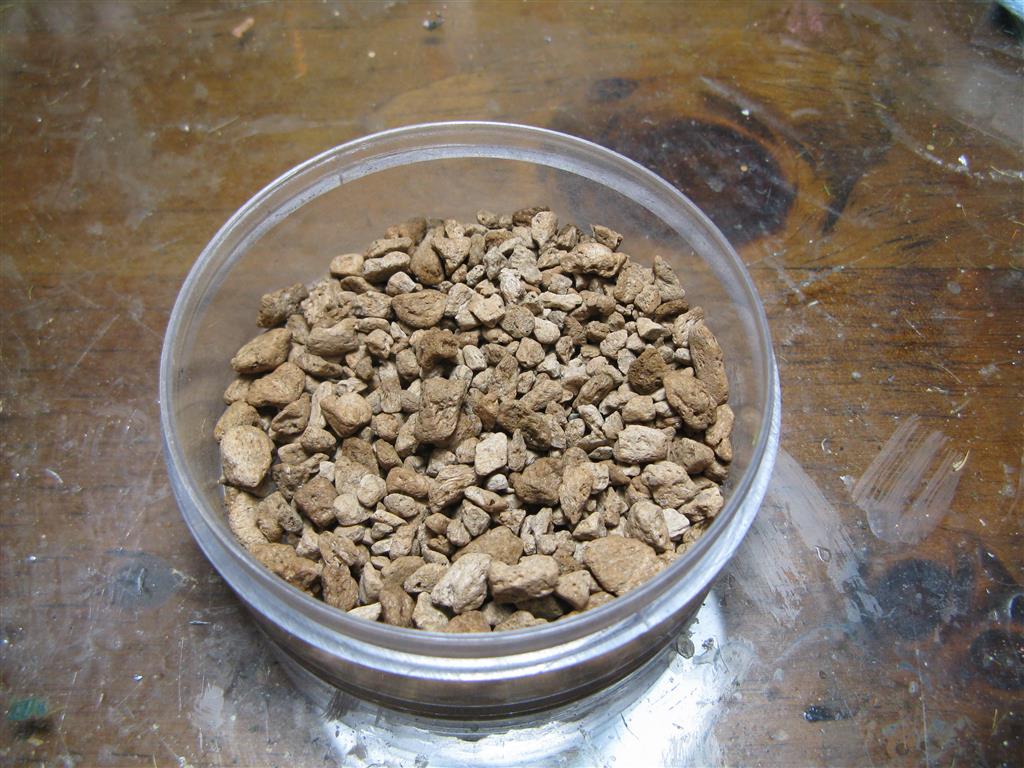
The stones I use are Woodland Scenics 'Talus'. A bag lasts forever. As you can see below the stuff comes in an un-natural ivory white color. I water down some stain and in a paper cup stain a bunch of this stuff to a more earthy color. It's ok for the stones to not be uniform in color. I stir them up a bit in the stain and dump them out on a paper towel and dry them off. It sounds like a lot of work but I do it about once a year or less. I make enough to fill a Gale Force 9 terrain container up. One container will last several armies worth of basing.
 Step 3 - Apply White Glue, Figures and Talus
I use white PVA 'School' glue - Elmers brand here in the USA. I put on a bunch and spread it evenly with a pallet knife. I then put my figure(s) on the stand exactly how I want them. If I'm basing cavalry I may use a toothpick to push some glue up onto the base between the horse's feet. I use white glue because it's inexpensive and makes removing the figures later for re-basing easy with an overnight soak in tap water
While the glue is wet I grab a pinch of talus stones and scatter them semi-randomly. At this time sometimes I also add bits of sand or other non-grass ground clutter. Woodland Scenics ballast and Gale Force 9 ground scatter products are both items I use. Whatever you choose have enough to use some on all of your bases.
 Step 4 - Apply Static Grass
There are many brands and blends of static grass. I've used many and almost as a rule I've found them to be too 'neon' green and too fake looking. Also a pure static grass product doesn't have any other items and looks too much like a putting green for my tastes. I prefer Scenic Express "Farm Pasture Blend" ground cover. It's about 75% static grass with the remainder consisting of small foam turf clumps and small woody stick-like bits. Just enough to make your bases look like a field and not a putting green. Invest the $10 on a static grass applicator. I prefer the plastic squeeze bottle type so I can squirt the grass in between figures as I desire. Puff the grass on from above and let dry overnight. I do this into an old shirt box. You will apply 10 times as much product at the base requires. The next day shake the stands off into the box and re-use everything that didn't stick to the base.
 Step 5 - Apply 'Detritus' to the blank areas of the base
I like to fill the empty spaces on my stands with what my friend George calls 'detritus' - non-figure scenic bits. For the most part I use Silfor Buffalo Grass clumps, Woodland Scenics foliage clusters in two colors and rocks made from broken up pieces of coarse cork board painted black and dry brushed grey. The latter I prefer to real rocks. Real rocks look too fake believe it or not.
For special stands I've been known to add broken cart wheels, barrels, tomb stones, weapons and even dead horses. The more variety the better when it comes to detritus! 90% of the painted items that are not figures are wooden items such as barrels and cart wheels. You would be amazed at how many of these you can paint up in one session of dry brushing and save for later. I keep such items in a drawer in my organizer. Another good source is the flea market at a show or club swap meet. That old ACW cannon looks too shoddy to use, break off the wheels and barrel and you have 3 pieces of detritus already painted up!


 I prefer 1/4" thick bases for my 28mm figures. The thicker bases give the player something other than my figures to grab onto. On my AWI armies I paint the whole base black with spray paint then hand paint the top Russian Green using cheap craft paints. For Napoleonics and Ancients I smartened up and paint the top and edges of the base with green spray paint from a can. I buy the cheap stuff at the department store for this use. The slots in the back of my bases are for labels and/or roster tags.


3 comments:
Very similar to how I base my figures AJ.
Always good to hear the techniques of another, they do look great though.
I bought my first pack of Stilflor "tufts" the other day. As Jim says, it's always good to hear how others base their figures.
Best wishes
Giles
Post a Comment