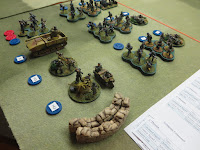
 The British forces included a good selection of armor, a platoon of Royal engineers, and a platoon of No. 41 Royal Marine Commandos. Orders for the British were to secure a crossing across the river, either by clearing the central bridge and pillbox, or by clearing one of the two fords.
  German forces were three platoons of kampfgrupped infantry, mixed Lufftwaffe and Ostruppen. The command elements included a 120mm mortar, an RSO Pak-40 self-propelled anti-tank gun and a Flak 37 anti-aircraft battery. The defending German forces also received some pre-prepared emplacements to deploy as they saw fit.
 Wargaming dog Lola seemed to be slightly more partial to the German defenders. Bribery is suspected....
 This is the view from the British jump-off point. The commandos had captured the small farmhouse overnight while the defending Germans would be waiting on the far side of the river. The rules used were modified Iron Cross. I've made some changes to make multi-player game play faster. I also adjusted the morale system, to make it less variable.
 The attacking British. Bob commanded the engineers, Byron the armor, Jeff the commandos and Charlie the HQ assets and Lieutenant.
  Me at the end of the table pulling a command token to start the game. Ralph commanding German 2nd platoon and Rob command German 1st platoon. Behind the camera Ed with German 3rd platoon and HQ.
Early in the game Jeff's commando machine gun and infantry pushed off some of Ralph's Osttruppen in the woods opposite the ford. Bob rushed a unit of engineers up to the dragon's teeth planting a satchel charge. The crazy engineers set the charge off too soon and took a morale marker from the blast, but cleared the obstacle. Later on in the battle they would be eliminated.
 Continuing his aggressive play, Bob rushed his universal carrier over the cleared ford carrying his flamethrower detachment right up to the craters outside of the village. Ed and Ralph's defending Luftwaffe units combined to wipe out the carrier with a panzerfoust blast and then killed the flamethrower team before it could unleash hot fire on the town or bunker. British engineer casualties continued to mount as another squad was eliminated by combined counter-attacks from all three German players as the Engineers attempted to attack the rear door of the bunker with another satchel charge.
Keeping Rob's AA battery and infantry honest, Byron's armor can be seen coming up the road in the distance of this shot. Byron's command armored car engaged Rob's Osttruppen while his Cromwell dueled with the Bunker. Both the Cromwell and M-10 tank destroyer dueled briefly with the RSO Pak 40 with neither scoring a hit. In the end, the Germans inflicted many more casualties to the attacking British, but the British did secure one ford and had a good start on pressing home the attack on the bridge and pillbox. This resulted in a narrow British victory.
At the end a successful play test and I received great feedback on how to make the scenario even better for our club's upcoming game night. The multi-player changes were well received. The players recommended good constructive changes to the scenario victory conditions and morale check system, both of which will result in improvements in the game.


1 comment:
Excellent game, AJ!
Post a Comment